Calculate your chlorine demand by testing your water’s current chlorine levels and determining the flow rate through your system—this ensures you select a metering pump with the appropriate dosing capacity, typically measured in gallons per day or milliliters per hour. Most residential applications require pumps delivering between 0.1 to 5 gallons daily, depending on water usage and contamination levels.
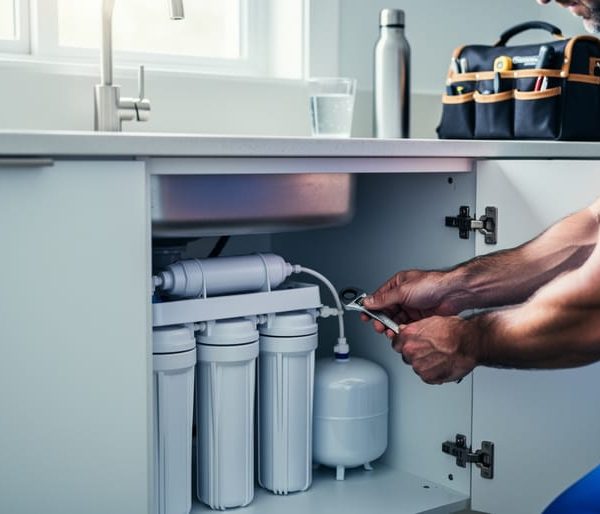
Install your chlorine metering pump upstream of any filtration equipment but downstream of your pressure tank, allowing 30-45 minutes of contact time before the water reaches your taps. Position the pump near an electrical outlet with proper ventilation, as chlorine vapors can corrode surrounding materials, and ensure the injection point includes a check valve to prevent backflow into your chemical reservoir.
Calibrate the pump by running it through a timed cycle into a graduated cylinder, measuring the actual output against manufacturer specifications—adjust the stroke length or frequency until you achieve consistent free chlorine residuals between 0.5 and 2.0 parts per million at your furthest tap. This verification process protects both your plumbing infrastructure and your family’s health.
Monitor your system weekly during the first month, checking chemical levels, inspecting tubing for leaks or brittleness, and cleaning the injection valve of mineral buildup. For those managing private water systems, metering pumps provide reliable disinfection that adapts to seasonal water quality changes while minimizing chemical waste and environmental impact through precise dosing technology.
What Makes Metering Pumps Different from Regular Chlorination Methods
When it comes to keeping your water safe and clean, metering pumps represent a significant leap forward from traditional chlorination methods. Unlike manual dosing or tablet-based systems, metering pumps deliver precise, automated chlorine treatment that adapts to your household’s actual water usage.
Traditional chlorination methods often rely on guesswork. Dropping tablets into a well or manually adding liquid chlorine means you’re estimating rather than measuring. These approaches can lead to inconsistent results—sometimes too little chlorine leaves harmful bacteria thriving, while overdosing creates unpleasant tastes and potential health concerns. Tablet systems dissolve at unpredictable rates depending on water temperature and flow, making consistent treatment nearly impossible.
Metering pumps work differently. These compact devices automatically inject precise amounts of chlorine solution directly into your water line. Think of them as intelligent guardians that measure water flow and deliver exactly the right dose every time. The pump draws chlorine solution from a storage tank and injects it at a controlled rate, ensuring consistent disinfection whether you’re filling a glass or running the washing machine.
The advantages extend beyond precision. Metering pumps eliminate the physical handling of chlorine products during routine operation, reducing exposure risks. They maintain stable chlorine levels throughout the day, providing reliable protection against waterborne pathogens. This consistency matters especially for families with vulnerable members or anyone concerned about water safety.
Similar to UV disinfection systems, metering pumps offer a modern, hands-off approach to water treatment. Consider upgrading to a metering pump if you currently struggle with inconsistent water quality, spend excessive time managing manual chlorination, or simply want peace of mind knowing your water receives professional-grade treatment. They’re particularly valuable for homes with private wells, fluctuating water demand, or anyone seeking to automate their water safety routine without sacrificing environmental responsibility through wasteful over-treatment.

Choosing the Right Metering Pump for Your Chlorination Needs
Understanding Pump Capacity and Flow Rates
Understanding pump capacity starts with a simple concept: how much chlorine solution your system can deliver over time. Capacity is typically measured in gallons per day (GPD) or gallons per hour (GPH), telling you the maximum volume your pump can move.
Flow rate, often called the injection rate, is the actual amount of chlorine solution being added to your water at any given moment. Think of capacity as your car’s top speed, while flow rate is how fast you’re actually driving. Most residential metering pumps offer adjustable flow rates, letting you fine-tune chlorine delivery to match your household’s specific needs.
Calculating your requirements involves knowing your water usage and desired chlorine concentration. A typical household uses 80-100 gallons per person daily. To determine your pump needs, multiply your daily water volume by the recommended chlorine dosage, usually 1-2 parts per million for safe drinking water.
For example, a family using 400 gallons daily would need approximately 0.003-0.006 gallons of chlorine solution per day, depending on concentration. Most residential metering pumps handle 0.1-10 GPD, providing plenty of capacity with room for adjustment.
Remember that oversizing isn’t necessarily better. Choosing a pump that matches your calculated needs ensures accurate dosing while minimizing chemical waste, supporting both effective water treatment and environmentally responsible practices.
Diaphragm vs. Peristaltic Pumps: Which Works Best
When choosing a chlorine metering pump for your home water system, you’ll encounter two primary options: diaphragm pumps and peristaltic pumps. Understanding their differences helps you select the right fit for your needs.
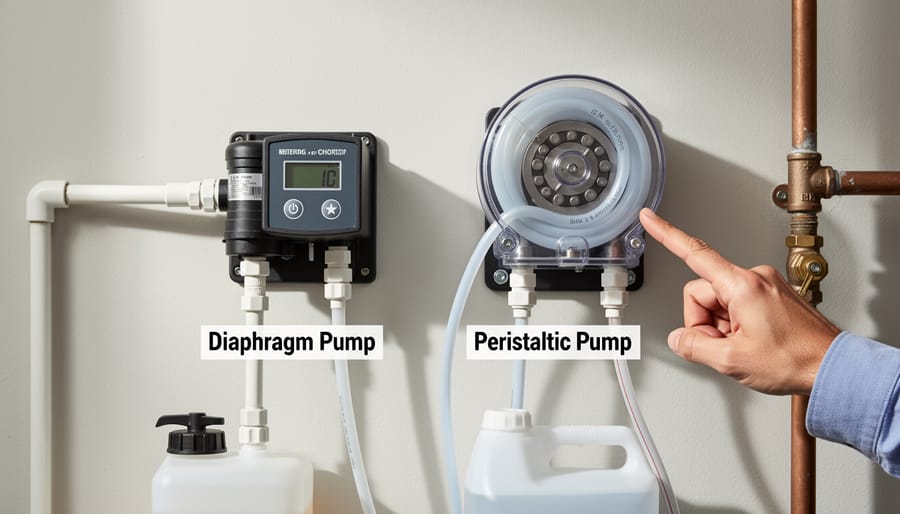
Diaphragm pumps use a flexible membrane that moves back and forth to push chlorine solution through your system. They’re the more common choice for homeowners because they’re budget-friendly, typically ranging from $200-$500. These pumps handle higher pressures well, making them ideal if you have a deep well or need to inject chlorine into pressurized lines. They’re also compact and relatively quiet. However, the diaphragm and check valves require periodic replacement, usually every 1-2 years depending on usage.
Peristaltic pumps work differently, using rotating rollers that squeeze a flexible tube to move the solution. Think of it like pinching a garden hose and sliding your fingers along it. The main advantage is exceptional accuracy and reliability, with fewer parts that contact the chemical. This means less maintenance and no valves to clog. They’re gentler on the equipment and excellent for precise dosing in smaller systems. The downside is higher upfront costs, typically $400-$800, and they generally can’t handle high-pressure applications as effectively.
For most homeowners with standard well systems, diaphragm pumps offer the best value and performance balance.
Step-by-Step Installation of Your Chlorine Metering Pump System
Safety First: Handling Chlorine Solutions Responsibly
Working with chlorine requires careful attention to safety, but don’t worry – with the right precautions, you can handle your metering pump system confidently. Chlorine solutions release fumes that can irritate your respiratory system, so always work in well-ventilated areas. If you’re handling concentrated chlorine, open windows and doors or use fans to maintain good airflow.
Personal protective equipment is non-negotiable. Wear chemical-resistant gloves, safety goggles, and long sleeves when refilling your metering pump or performing maintenance. Even diluted chlorine can irritate skin and eyes, so treating every interaction with respect protects your health.
Store chlorine solutions in their original containers, away from direct sunlight and heat sources, in a cool, dry location that’s inaccessible to children and pets. Never mix chlorine with other chemicals, especially acids or ammonia-based products, as this creates dangerous reactions.
From an eco-conscious perspective, use only the amount of chlorine necessary for effective water treatment. Modern metering pumps excel at precise dosing, which minimizes chemical waste and reduces environmental impact. When disposing of old chlorine solutions, contact your local hazardous waste facility rather than pouring them down drains – this protects waterways and aquatic ecosystems while maintaining your commitment to sustainable living practices.

Where to Position Your Pump and Chemical Tank
Proper positioning of your metering pump and chemical tank ensures safe, efficient operation while minimizing maintenance headaches. Start by selecting a dry, well-ventilated area that stays above freezing year-round, as temperature extremes can affect chlorine concentration and equipment performance. Your pump should be as close as possible to the injection point in your water system to reduce tubing length and potential dosing delays.
Accessibility matters tremendously for routine maintenance and chemical refills. Position your setup at a comfortable working height with at least three feet of clearance on all sides. This space allows you to safely handle chlorine containers and perform adjustments without awkward reaching or cramped conditions.
Keep your chemical tank elevated above the pump to enable gravity-assisted flow, but ensure it’s secure and stable on a flat surface. Never install equipment in direct sunlight or near heat sources, which accelerate chemical degradation and reduce effectiveness. Choose locations away from living spaces to contain any potential fumes, and always mount pumps to a solid wall or sturdy base to prevent vibration-related issues.
Consider installing near a floor drain for spill containment and ensure your chosen spot complies with local building codes regarding chemical storage and water treatment equipment.
Connecting the System to Your Water Line
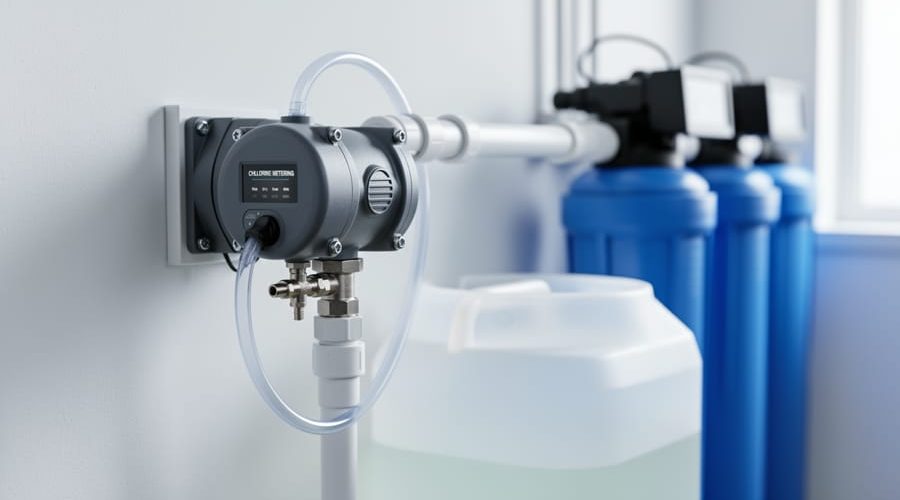
Successfully integrating your metering pump requires careful attention to the injection point and proper connections. The best location for chlorine injection is typically after your pressure tank but before any filters or treatment systems. This positioning allows the chlorine adequate contact time with the water while protecting downstream equipment from premature wear.
Start by identifying a suitable spot on your main water line where you can drill a small injection port. The ideal setup uses a stainless steel injection fitting designed specifically for chemical feed applications. These fittings create a secure connection point that prevents leaks and ensures the chlorine enters the water stream safely.
For tubing, select chemical-resistant materials like PVDF or reinforced polyethylene that can withstand chlorine exposure. The process of connecting to water lines follows similar principles across various water treatment systems. Cut your tubing to the appropriate length, allowing some slack for movement without creating kinks.
Installing a check valve is non-negotiable. This small but crucial component prevents water from back-flowing into your chemical tank, which could dilute your chlorine solution or damage your pump. Position the check valve on the discharge side of the pump, as close to the injection point as possible.
Before finalizing connections, test all fittings for tightness and verify that your injection point doesn’t create excessive back-pressure. Most metering pumps operate best at pressures below 100 PSI. Once assembled, run clean water through the system first to check for leaks before introducing chlorine solution.
Calibrating Your Pump for Accurate Chlorine Dosing
Proper calibration ensures your metering pump delivers the precise amount of chlorine needed to keep your water safe without overdoing it. This balance is crucial for both health and environmental reasons, as over-chlorination wastes resources and can harm beneficial microorganisms in septic systems.
Start by determining your water system’s chlorine demand. Test your water at the point of use, not just at the pump, using a reliable chlorine test kit. You’re looking for a residual chlorine level between 0.2 and 0.5 parts per million for drinking water. This range effectively eliminates harmful bacteria while remaining safe for consumption and gentle on the environment.
Begin calibration by filling a graduated cylinder or measuring cup with water. Run your pump for exactly 10 minutes while it draws from this container. Measure how much water the pump consumed during this period and multiply by six to determine your hourly flow rate. This gives you a baseline for adjusting chlorine delivery.
Next, calculate your actual dosing needs. Consider factors like water usage patterns, source water quality, and seasonal variations. During summer months or after heavy rainfall, you may need to increase dosing temporarily as bacterial levels typically rise.
Adjust your pump’s stroke length or frequency according to the manufacturer’s instructions. Make small changes incrementally, testing water quality after each adjustment. Wait at least 24 hours between adjustments to allow chlorine levels to stabilize throughout your system.
Keep a calibration log documenting your settings, test results, and any changes made. This record helps you identify patterns and quickly troubleshoot issues. Test your water weekly during the first month after installation, then monthly once you’ve achieved consistent results.
Remember that calibration isn’t a one-time task. Water conditions change seasonally, and pump components wear over time. Regular testing and minor adjustments maintain optimal performance while minimizing chemical waste and environmental impact.
Essential Maintenance Tasks That Keep Your System Working
Daily and Weekly Monitoring Routines
Establishing simple monitoring routines helps ensure your chlorine metering pump operates efficiently while protecting your water quality. Start each day with a quick visual inspection of your pump. Look for any signs of leaks around connections, unusual noises during operation, or visible wear on tubing. This 30-second check can catch small problems before they become costly repairs.
Test your water’s chlorine levels at least three times weekly using pool test strips or a digital meter. Ideal residential chlorine levels typically range between 1-3 parts per million. If readings consistently fall outside this range, your pump may need recalibration. Keep a simple logbook to track these measurements, which helps identify patterns over time.
Check your chlorine solution tank weekly to avoid running dry, which can damage the pump and leave your water untreated. Most homeowners find marking their tank with measurement lines makes monitoring easier. Plan to refill when levels drop to one-quarter capacity, giving you time to purchase supplies without emergency trips.
These routine checks take less than five minutes but significantly extend your equipment’s lifespan while maintaining consistent water treatment. Think of it as similar to checking your car’s oil—small preventive actions that save considerable trouble down the road.

Monthly Deep-Cleaning and Tune-Up Procedures
Once a month, dedicate time to more thorough maintenance that keeps your chlorine metering pump running efficiently and extends its lifespan. Begin by inspecting all tubing for cracks, discoloration, or stiffness, which indicate chemical degradation. Replace any compromised sections immediately, as deteriorated tubing can leak chlorine solution and reduce dosing accuracy.
Check the diaphragm or peristaltic tubing, depending on your pump type. Diaphragms typically need replacement every 6-12 months, while peristaltic tubing may last longer but should be rotated quarterly to prevent wear in one spot. Examine check valves for mineral buildup or debris that restricts flow. Remove valves carefully, soak them in white vinegar for 30 minutes to dissolve scale, then rinse thoroughly with clean water.
Perform a complete system flush by disconnecting the suction line from the chlorine container and placing it in fresh water. Run the pump for several minutes to clear residual chemicals from all components. This simple step prevents crystallization inside the pump head and maintains optimal performance.
Finally, verify all connections remain tight and leak-free. Even small drips waste chlorine and pose environmental concerns. Document your maintenance activities and note any unusual wear patterns, helping you anticipate future replacements. This proactive approach ensures reliable water treatment while minimizing chemical waste and supporting sustainable household management.
Winterization and Seasonal Considerations
Cold weather poses serious risks to chlorine metering pumps, but simple precautions protect your investment and ensure year-round water safety. If temperatures in your area drop below freezing, take action before winter arrives to prevent costly damage.
Start by draining all water from the pump head, tubing, and check valves. Even small amounts of trapped water can expand when frozen, cracking components and requiring replacement. Remove the pump head if possible and store it indoors in a temperature-controlled space. For systems that must remain operational during winter, consider installing heat trace tape around exposed tubing and wrapping insulated blankets around the pump housing.
When spring arrives, conduct a thorough inspection before restarting. Check all seals and gaskets for brittleness or cracking that may have developed during cold storage. Replace tubing that appears stiff or discolored. Prime the system carefully, watching for leaks at connection points. Run a calibration test to verify accurate dosing before relying on the system for daily water treatment.
For eco-conscious homeowners, proper winterization reduces waste by extending equipment lifespan and preventing emergency replacements that generate unnecessary environmental impact from manufacturing and shipping.
Troubleshooting Common Metering Pump Problems
Even with proper installation, metering pumps occasionally experience hiccups that can affect your pool or water treatment system’s performance. The good news is that most issues are straightforward to diagnose and resolve without calling a professional.
If you notice inconsistent chlorine dosing, where your water tests show fluctuating chlorine levels, start by checking the pump tubing. Over time, tubing can develop tiny cracks or become rigid, affecting the pump’s ability to draw chemical solution accurately. Inspect the entire length for wear, paying special attention to connection points. Also verify that your chemical container hasn’t run empty or developed sediment at the bottom that could clog the intake line. A simple solution involves replacing worn tubing annually as preventive maintenance, which costs just a few dollars but prevents bigger headaches down the road.
Leaks around pump connections are another common concern. These typically occur at tube fittings or the pump head. First, power off your system for safety. Then carefully tighten all fittings with appropriate tools, being careful not to overtighten and crack plastic components. If leaks persist, the pump diaphragm may need replacement. This rubber component wears naturally over time, especially in systems that run continuously. Replacement diaphragms are readily available and most pumps feature tool-free access to this component.
When your pump stops working entirely, check the basics before assuming equipment failure. Verify power supply by testing the outlet with another device. Examine the circuit breaker and any inline fuses. If power reaches the pump but it won’t operate, the issue might be an airlock in the system. To resolve this, disconnect the discharge tube and run the pump briefly to purge trapped air, then reconnect everything securely.
Modern metering pumps include alarm signals that indicate specific problems. Consult your owner’s manual to decode these alerts, which might signal low chemical levels, blocked lines, or maintenance requirements. Many alarms reset automatically once you address the underlying issue.
Regular observation helps catch problems early. Make it a habit to visually inspect your metering pump weekly, looking for drips, unusual sounds, or error lights. This proactive approach aligns with sustainable living principles by extending equipment life and preventing chemical waste from malfunctions.
Environmental and Cost Benefits of Automated Chlorination
Automated chlorination through metering pumps represents a significant leap forward in both environmental stewardship and household economics. Unlike traditional chlorination methods that rely on guesswork or manual dosing, metering pumps deliver precisely measured amounts of chlorine based on your water system’s actual needs. This precision translates directly into reduced chemical waste, as you’re no longer adding excess chlorine that ultimately ends up in the environment.
The environmental advantages extend beyond simple waste reduction. When chlorine levels are carefully controlled, you minimize the formation of potentially harmful disinfection byproducts that can form when chlorine concentrations are too high. This means cleaner water flowing from your home into local waterways and septic systems. For homeowners committed to sustainable living, this precise dosing approach aligns perfectly with broader eco-conscious practices, reducing your household’s chemical footprint while maintaining safe, clean water.
From a financial perspective, the cost savings become apparent quickly. While a metering pump requires an initial investment, the reduction in chlorine consumption typically leads to significant savings within the first year. You’re purchasing only what you need, rather than overcompensating with excessive chemicals. Additionally, proper chlorination protects your plumbing infrastructure from bacterial buildup and corrosion, extending the lifespan of pipes, water heaters, and appliances.
Compared to alternative chlorination methods like tablet feeders or manual dosing, automated metering pumps offer superior long-term value. They eliminate the ongoing expense of purchasing pre-packaged tablets, which often contain fillers and cost more per unit of active chlorine. The automation also saves countless hours of maintenance time, freeing you to focus on other aspects of home care while ensuring consistent water quality protection.
Investing in a metering pump system for chlorine treatment represents a smart, forward-thinking choice for homeowners committed to maintaining safe, high-quality water while embracing sustainable household practices. These reliable devices deliver precise chlorination that protects your family from harmful contaminants without the guesswork or waste associated with manual methods. By automating the dosing process, you gain peace of mind knowing your water receives consistent treatment day after day.
The key to long-term success lies in proper installation and care. When you follow manufacturer guidelines during setup and commit to routine maintenance checks, your system will perform efficiently for years to come. Regular inspection of tubing, verification of chemical levels, and occasional calibration adjustments ensure your pump continues delivering accurate doses while minimizing environmental impact through reduced chemical waste.
Beyond the immediate benefits of cleaner water, metering pumps align with eco-conscious living by optimizing resource use and preventing over-chlorination that can harm local ecosystems. Modern systems are designed for energy efficiency and durability, reducing the need for frequent replacements.
Now is the time to take action. Whether you’re installing a new system or optimizing an existing one, you have the knowledge to move forward confidently. Your commitment to understanding this technology demonstrates responsibility toward both your household’s health and environmental stewardship. With the right approach, safe water quality becomes an achievable, sustainable reality for your home.