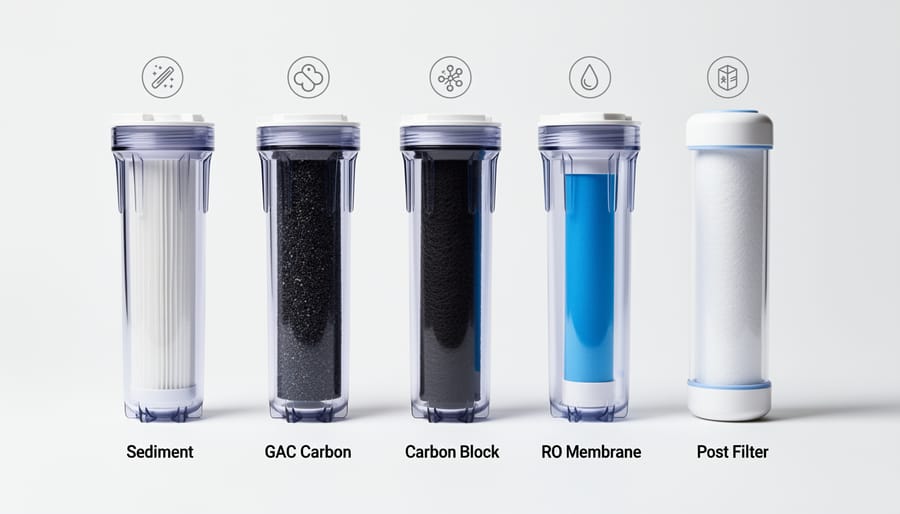
Picture five precision-engineered barriers standing between your tap and truly clean drinking water. Each stage in a reverse osmosis system targets specific contaminants, working in sequence to transform ordinary tap water into purified refreshment. Understanding this diagram isn’t just academic—it’s your roadmap to proper installation, effective troubleshooting, and confident maintenance of your home’s most important water filtration investment.
Locate the sediment filter at stage one, where particles as small as 5 microns get trapped before they can damage delicate membranes downstream. Identify stages two and three as your carbon filter guards, removing chlorine, volatile organic compounds, and chemicals that affect taste and odor. Find the heart of the system at stage four—the semi-permeable RO membrane that blocks dissolved solids, heavy metals, and microscopic contaminants down to 0.0001 microns. Recognize stage five as your polishing filter, the final carbon block that ensures crisp, fresh-tasting water right before it reaches your glass.
Whether you’re planning installation in your kitchen, diagnosing why water tastes off, or scheduling filter replacements, this visual blueprint reveals exactly what’s happening inside those cylindrical housings under your sink. Master this five-stage flow, and you’ll understand not just where each component connects, but why proper sequence matters for protecting your health and maximizing your system’s lifespan.
Understanding the 5-Stage RO System Diagram
How Water Flows Through Your System
Understanding how water moves through your reverse osmosis system helps you appreciate why each stage matters for your home’s water quality. The journey begins when your tap water enters the system under normal household pressure, typically between 40-80 PSI.
First, water encounters the pre-filtration stages, where sediment and carbon filters remove larger particles, chlorine, and organic compounds. Think of these as the security gates that protect the delicate reverse osmosis membrane from damage and premature wear.
Next comes the heart of the system: the RO membrane. Here, water molecules are forced through microscopic pores while contaminants like lead, fluoride, and dissolved solids get flushed away as wastewater. This process produces exceptionally pure water, but it takes time.
The purified water then flows into a pressurized storage tank, typically holding 2-4 gallons. This tank ensures you have clean water ready whenever you need it, without waiting for the slow filtration process.
Finally, when you turn on your dedicated faucet, water passes through a post-carbon filter for a final polish, removing any residual tastes before reaching your glass. This sequential approach ensures comprehensive purification while maintaining steady water availability for your household.
Key Components Beyond the Filters
Beyond the five filter stages, your reverse osmosis system relies on several essential components that work together to deliver clean water efficiently. The storage tank is perhaps the most visible element, typically holding 2-4 gallons of purified water so you have immediate access when turning on your faucet. This pressurized tank ensures consistent water flow even when the system isn’t actively filtering.
The automatic shut-off valve is your system’s smart guardian, stopping water production once the storage tank fills completely. This eco-friendly feature prevents water waste and protects your system from unnecessary wear. Meanwhile, the flow restrictor maintains proper water pressure through the membrane by controlling the drain flow rate, ensuring optimal filtration efficiency.
A pressure regulator protects your system by maintaining safe water pressure levels, preventing damage to the delicate membrane. Some diagrams also show a check valve that prevents backflow contamination, and a drain saddle that safely routes wastewater away. Understanding these components helps you maintain your system effectively and troubleshoot issues when they arise, ensuring your household enjoys consistently pure water.
Breaking Down Each Filtration Stage
Stage 1: Sediment Pre-Filter
The sediment pre-filter serves as your reverse osmosis system’s first line of defense, catching visible contaminants before they can damage the more delicate filters downstream. Think of it as a protective gatekeeper that blocks larger particles like dirt, sand, rust, and silt from entering your system.
This stage typically uses a filter with a 5-micron rating, meaning it captures particles as small as five-thousandths of a millimeter. To put this in perspective, a human hair is about 70 microns wide, so this filter catches debris far smaller than what your eye can easily see.
By removing these larger particles first, the sediment pre-filter extends the lifespan of your entire system, particularly the expensive reverse osmosis membrane that comes later. Without this protection, sediment would quickly clog and damage downstream components, leading to costly repairs and reduced water quality.
Most sediment filters need replacement every 6 to 12 months, depending on your water quality. If you notice reduced water pressure or discolored water, it might be time for a change. Homes with well water or older pipes typically need more frequent replacements due to higher sediment levels. Regular maintenance at this stage is an eco-friendly practice that prevents waste and keeps your system running efficiently for years.
Stage 2: Carbon Pre-Filter (GAC)
The carbon pre-filter serves as your RO system’s protective shield, using granular activated carbon (GAC) to tackle contaminants that could seriously damage the delicate reverse osmosis membrane in later stages. Think of it as a chemical sponge that captures harmful elements before they reach your system’s core.
GAC works through a fascinating process called adsorption, where contaminants stick to the carbon’s surface like magnets. The carbon granules are incredibly porous, with a single pound containing a surface area equivalent to several football fields. This massive surface area allows the filter to trap chlorine, volatile organic compounds (VOCs), pesticides, and unpleasant odors and tastes that chlorine treatment leaves behind.
Here’s why this stage matters: chlorine and similar chemicals can deteriorate the RO membrane, shortening its lifespan and reducing filtration efficiency. By removing these aggressive compounds early, the carbon pre-filter extends your system’s life and maintains optimal performance. You’re essentially protecting your investment while ensuring cleaner, better-tasting water.
From an eco-living perspective, this stage demonstrates how smart design reduces waste. By preventing membrane damage, you’ll replace components less frequently, minimizing environmental impact and saving money long-term.
Stage 3: Carbon Block Pre-Filter (CTO)
As water moves through your RO system, Stage 3 delivers another crucial layer of filtration through a Carbon Block (CTO) pre-filter. While the first carbon stage removed larger particles and initial chlorine, this second carbon stage works with finer filtration to capture smaller contaminants that slipped through earlier.
Think of this stage as your RO membrane’s personal bodyguard. The carbon block filter uses compressed activated carbon with a tighter pore structure, typically filtering particles down to 5 microns or smaller. This finer filtration removes additional chlorine, volatile organic compounds, pesticides, and other chemical contaminants that could damage or reduce the efficiency of the delicate RO membrane in the next stage.
The difference between granular and block carbon matters here. Block carbon offers better contact time with water, meaning contaminants have more opportunity to bond with the carbon surface. This enhanced contact results in more thorough removal of taste and odor issues, along with chemical pollutants.
From an eco-living perspective, protecting your RO membrane through proper pre-filtration extends its lifespan significantly, reducing waste and replacement frequency. This stage typically needs replacement every 6-12 months depending on your water quality and usage, making it a cost-effective investment in both system longevity and consistently pure drinking water for your household.

Stage 4: Reverse Osmosis Membrane
This is where the magic happens. Stage 4 houses the reverse osmosis membrane, the true powerhouse of your filtration system. Think of it as an incredibly fine gatekeeper that only allows pure water molecules to pass through while blocking nearly everything else.
Here’s how it works in simple terms: your home’s water pressure pushes water against a semi-permeable membrane with microscopic pores—so tiny that only water molecules can squeeze through. Dissolved solids like sodium, chlorine, and fluoride, along with heavy metals such as lead and arsenic, are too large to pass. The membrane also stops bacteria, viruses, and other microscopic contaminants that escaped the earlier stages.
The reverse osmosis process separates your water into two streams. The purified water moves forward to the final stage, while the rejected contaminants wash down your drain as wastewater. This is why RO systems use more water than they produce—it’s necessary to keep the membrane clean and prevent buildup.
This membrane typically removes 90-99% of total dissolved solids, making it exceptionally effective for households dealing with hard water, well water, or municipal supplies with concerning contaminant levels. The membrane is also the component you’ll need to replace every 2-3 years, depending on your water quality and usage.
Understanding this stage helps you appreciate why proper pre-filtration in stages 1-3 matters so much. Without removing sediment and chlorine first, your expensive RO membrane would clog quickly and lose effectiveness, requiring premature replacement.
Stage 5: Post-Carbon Filter (Polishing Filter)
The post-carbon filter, also called the polishing filter, is your water’s final checkpoint before it flows from your dedicated RO faucet. Think of it as the finishing touch that ensures every glass tastes crisp and refreshing.
This stage uses activated carbon, typically coconut shell carbon, to capture any residual tastes or odors that might have developed while water sat in the storage tank. Even though the RO membrane removes up to 99% of contaminants, water can occasionally pick up a slight plastic taste from the tank itself. The post-carbon filter eliminates these subtle flavor issues completely.
Beyond improving taste, this filter also acts as a safety net, catching any fine carbon particles that may have dislodged from earlier filtration stages. It’s a small but mighty component that makes a noticeable difference in your drinking experience.
Most post-carbon filters need replacement every 12 months, though this varies based on your household’s water consumption. If you notice your water starting to taste flat or slightly off, it’s usually a sign this final filter needs changing. This stage perfectly demonstrates how modern water treatment combines cutting-edge filtration technology with practical design, giving you bottled-water quality straight from your tap while reducing plastic waste.
Using the Diagram for Installation Success
Reading Connection Points and Tubing Routes
Understanding how to read your reverse osmosis system diagram is essential for proper installation and future maintenance. These diagrams serve as your roadmap, showing exactly where each tube connects and how water travels through your system.
Most RO system diagrams use color-coded tubing to simplify the installation process. Blue lines typically indicate incoming cold water, while red or yellow lines show the purified water output. Black tubes usually represent wastewater drain lines. This color system isn’t just decorative—it prevents costly connection mistakes that could compromise your water quality or damage the system.
To trace the water flow, start at the inlet connection where your home’s water supply enters. Follow the line through each filter stage, watching how the diagram shows water entering and exiting each canister. The membrane housing is usually the largest component, where water splits into two paths: purified water continuing to your faucet and wastewater heading to the drain.
Connection points appear as dots, circles, or junction markers on diagrams. Pay special attention to quick-connect fittings, which are the most common attachment method. The diagram will show how tubes push into these fittings and lock in place. Similar to installation diagram guidance for other water treatment systems, understanding these visual cues makes the process straightforward, even for first-time installers. When troubleshooting leaks or low water pressure, this same flow-tracing method helps identify exactly where problems occur in your system.
Common Installation Mistakes to Avoid
Even with a detailed diagram in hand, several common mistakes can derail your reverse osmosis system installation. Understanding these pitfalls before you begin can save you time, money, and frustration.
One of the most frequent errors is reversed tubing connections. Color-coded lines exist for a reason, yet many first-time installers accidentally swap the concentrate line with the pure water line. Your diagram clearly shows which tube connects where, so double-check each connection before tightening fittings. A reversed connection won’t just prevent proper water flow; it can contaminate your filtered water with waste.
Improper drain line setup causes many headaches too. The drain line must have an air gap to prevent backflow contamination, and it should never be inserted directly into the drainpipe. Your diagram illustrates the correct positioning, typically with the line secured above the drain’s water level. Failing to follow this detail violates plumbing codes in many areas and compromises your water safety.
Missing or improperly installed components represent another common issue. The flow restrictor, often overlooked, is essential for maintaining proper system pressure and water production rates. Without it, your system won’t reject contaminants effectively. Similarly, forgetting to install the check valve can lead to backward water flow that damages your filters.
Before starting your project, familiarize yourself with typical RO system installation costs and consider whether professional installation might prevent costly mistakes. Your diagram serves as your roadmap, but careful attention to detail ensures your investment delivers clean, safe drinking water for years to come.
Maintenance Made Simple with Your Diagram
When to Replace Each Stage
Understanding when to replace each filter stage keeps your reverse osmosis system running efficiently and protects your water quality. Your system diagram serves as an essential reference guide, showing you exactly where each filter sits and helping you identify which components need attention.
The sediment pre-filter (Stage 1) typically requires replacement every 6-12 months, depending on your water quality. If you notice reduced water flow or visible sediment buildup, it’s time for a change. The carbon pre-filters (Stages 2 and 3) should be replaced every 6-12 months as well, since they work hard to remove chlorine and organic compounds that could damage the RO membrane.
Your RO membrane (Stage 4) is the workhorse of the system and usually lasts 2-3 years with proper pre-filter maintenance. This is the most expensive component, which is why keeping those pre-filters fresh is crucial for protecting your investment. The post-carbon filter (Stage 5) polishes your water before it reaches your tap and needs replacement every 12 months.
Your system diagram labels each filter position, making water treatment system maintenance straightforward even for beginners. Most diagrams include arrows or numbers showing the water flow direction, helping you understand which filters protect others downstream. Many modern systems also feature color-coded housings or clear labels matching your diagram, eliminating guesswork during replacement. Keep your diagram handy and mark replacement dates on your calendar to maintain peak performance and ensure your family always has access to clean, great-tasting water.
Troubleshooting Using Your System Diagram
Your system diagram becomes an invaluable troubleshooting tool when problems arise. Start by identifying where water flows along each stage, which helps pinpoint exactly where issues occur.
For low water pressure at your faucet, trace backward from stage five. Check if the storage tank valve is fully open and examine the pressure gauge—it should read 7-8 PSI when empty. Next, inspect the flow restrictor on the drain line between stages three and four. A clogged restrictor reduces wastewater flow, which paradoxically decreases your clean water output.
When dealing with leaks, your diagram shows every connection point. Follow the water pathway from the cold water supply through each filter housing and membrane. Tighten any loose fittings at stage transitions, particularly where tubing connects to the membrane housing and storage tank. Most leaks happen at these high-pressure junction points.
Poor water taste typically indicates problems in the final stages. Using your diagram, check if water bypasses the post-carbon filter (stage five) or if filters are overdue for replacement. The diagram also helps you verify correct tubing connections—reversed tubes can cause untreated water to mix with filtered water.
Keep your system diagram handy during maintenance. This eco-friendly approach helps you solve problems independently, reducing service calls and extending your system’s lifespan while ensuring your household enjoys consistently pure water.
Environmental Benefits of Understanding Your RO System
Understanding how your 5-stage RO system works isn’t just about getting cleaner water—it’s about making environmentally responsible choices that benefit our planet. When you know which filters do what and when they need replacing, you avoid the wasteful practice of changing all filters simultaneously. This targeted approach can extend the life of pre-filters and post-filters by months, reducing landfill waste and saving you money.
Proper maintenance based on a solid understanding of your system diagram also prevents premature membrane failure. The semi-permeable membrane, the heart of your RO system, can last 2-3 years with proper care but may need replacement in under a year if pre-filters aren’t changed on schedule. By monitoring your system’s performance and understanding the role each stage plays, you’ll catch issues early and minimize waste.
Perhaps the most significant environmental impact comes from eliminating bottled water dependency. A single household RO system can replace thousands of plastic bottles annually. The average family of four consumes roughly 1,456 single-use plastic bottles per year for drinking water alone. Your understanding of the system ensures it operates efficiently, maintaining the water quality that keeps you reaching for the tap instead of packaged water.
Beyond waste reduction, knowledgeable system management means fewer service calls, reducing the carbon footprint associated with technician visits and emergency part shipments. You become an active participant in sustainable living through informed water treatment choices.

Understanding your 5-stage reverse osmosis system diagram isn’t just helpful—it’s essential for getting the most out of your investment in cleaner, healthier water. Think of the diagram as your system’s roadmap, a visual guide that demystifies what might initially seem complicated. By familiarizing yourself with each stage and component, you’re empowering yourself to handle basic maintenance, identify potential issues before they become costly problems, and ensure your family consistently enjoys premium water quality.
We encourage you to keep your RO system diagram in an accessible location, perhaps taped inside a kitchen cabinet door or saved on your phone. When it’s time to replace filters or troubleshoot unusual tastes or reduced water flow, you’ll appreciate having this reference readily available. Rather than viewing it as an intimidating technical document, see it as a practical tool that puts you in control of your home’s water purification process.
As you become more familiar with your system’s layout, you’ll likely find that maintenance becomes second nature. This knowledge also helps you make informed decisions about upgrades or modifications that align with your household’s specific water quality needs and sustainability goals. Remember, every drop of purified water your system produces represents a step away from single-use plastic bottles and toward a more environmentally responsible lifestyle. Your diagram is the key to maintaining that positive impact for years to come.