Identify the water spot’s cause before attempting removal—active leaks require immediate pipe or roof repairs, while older stains from resolved issues can be cleaned safely. Mix equal parts white vinegar and water in a spray bottle, apply to the stained ceiling area, let sit for 30 minutes, then gently blot with a clean cloth to lift mineral deposits and discoloration without damaging paint or drywall.
Apply a stain-blocking primer like Kilz or Zinsser to prevent the spot from bleeding through your fresh coat of paint, especially important for tannin-based stains from wood or rust. Once dry, repaint the area with matching ceiling paint using a roller for seamless blending.
Those persistent white rings around water spots reveal hard water minerals—calcium and magnesium deposits that accumulate wherever water evaporates. This same mineral buildup affects your pipes, appliances, and fixtures throughout your home, reducing their efficiency and lifespan. Installing a water softener or whole-house filtration system addresses the root cause, preventing future ceiling stains while protecting your plumbing infrastructure and improving drinking water quality.
Test your ceiling’s moisture level with an inexpensive moisture meter before painting—readings above 16% indicate ongoing water intrusion that will cause new stains within weeks. Check attic insulation and ventilation simultaneously, as condensation from poor airflow creates the same ceiling damage as actual leaks. Prevention through proper water treatment and home maintenance saves thousands in ceiling repairs, paint jobs, and structural damage over time while supporting sustainable home management practices.
Understanding What’s Really Causing Those Ceiling Stains
Hard Water Minerals vs. Plain Water Damage
Understanding the difference between hard water mineral deposits and plain water damage is key to choosing the right cleaning approach and preventing future ceiling stains.
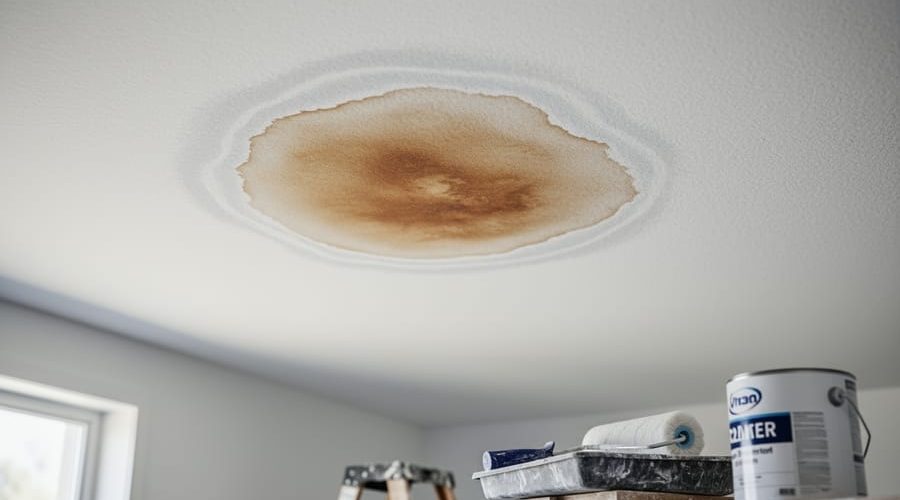
When hard water evaporates on your ceiling, it leaves behind dissolved minerals—primarily calcium and magnesium. These minerals create distinctive white, chalky, or crusty deposits that often appear powdery to the touch. You might notice these white spots clustered around areas where water has dripped repeatedly, such as beneath plumbing fixtures or after a minor roof leak. Hard water stains are typically lighter in color and have a crystalline texture that can sometimes be scraped off gently.
In contrast, plain water damage without significant mineral content produces brown or yellow stains. These discolorations result from water absorbing tannins from wood framing, rust from metal components, or dirt and debris as it travels through your home’s structure. Plain water stains usually appear as darker, spreading patches that soak into the ceiling material rather than sitting on the surface. They often indicate more serious moisture problems that have allowed water to saturate building materials.
The distinction matters because hard water deposits are generally easier to remove with acidic cleaners like vinegar, while brown stains may require specialty stain-blocking primers after cleaning. Additionally, recognizing hard water marks signals an opportunity to improve your home’s water quality through filtration or softening systems. These eco-friendly solutions not only prevent future ceiling stains but also extend the life of your appliances, reduce cleaning product usage, and contribute to a more sustainable household overall.
Common Sources of Ceiling Water Spots
Before you can effectively fix water spots on your ceiling, it’s essential to identify where the moisture is coming from. Understanding the source helps you address the root cause, not just the cosmetic damage.
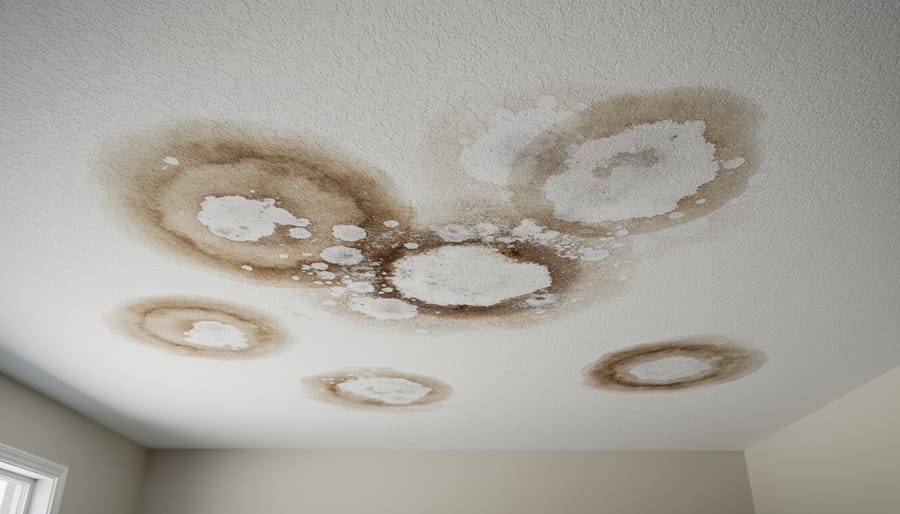
Roof leaks are among the most common culprits, especially after heavy rainfall or in homes with aging shingles. Water seeps through compromised roofing materials and travels along rafters before appearing as ceiling stains. Plumbing issues within walls or above ceilings can also cause persistent water spots, particularly around bathrooms and kitchens where pipe networks are concentrated. Leaking supply lines or drain pipes often create irregular brown or yellowish stains that gradually expand.
Condensation problems frequently occur in poorly ventilated spaces like bathrooms, especially during hot showers when moisture accumulates on cool ceiling surfaces. This issue is exacerbated in homes without proper ventilation systems. Additionally, overhead bathroom fixtures such as toilets, bathtubs, or shower pans on upper floors can develop slow leaks that manifest as water spots on lower-level ceilings.
If you notice white, crusty deposits around water spots, this often indicates hard water minerals, suggesting the need for improved water quality management throughout your home.
Step-by-Step: Removing Water Spots and Scale from Your Ceiling
Safety First: Preparing Your Workspace
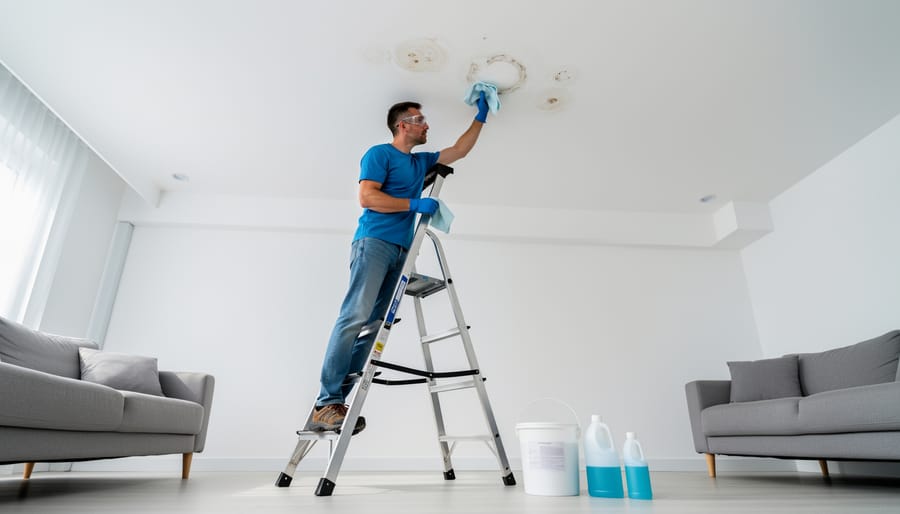
Before tackling those water spots, take a moment to prioritize safety and protect your home. First, investigate whether you’re dealing with an old stain or an active leak. Look for dampness, discoloration spreading, or water dripping. If you find an active leak, turn off the water supply to that area immediately and address the source before cleaning.
Ensure the ceiling is completely dry before starting any repair work, as moisture can harbor mold growth. Wear safety glasses to protect your eyes from falling debris and cleaning solution drips. Use a sturdy ladder on level ground, and have someone nearby to assist if possible.
Lay down drop cloths or plastic sheeting to protect your flooring and furniture from cleaning products and stain residue. Open windows for proper ventilation, especially if using commercial cleaners. Consider wearing gloves to protect your hands from harsh chemicals or choose gentler, eco-friendly alternatives like vinegar solutions that are safer for both you and the environment while still effectively removing mineral deposits from hard water.
Cleaning Fresh Water Spots and Mineral Deposits
When you’ve discovered fresh water spots on your ceiling, acting quickly makes removal much easier. These recent stains, often caused by mineral-rich hard water, respond well to gentle, eco-friendly cleaning methods that won’t damage your ceiling’s surface or introduce harsh chemicals into your home.
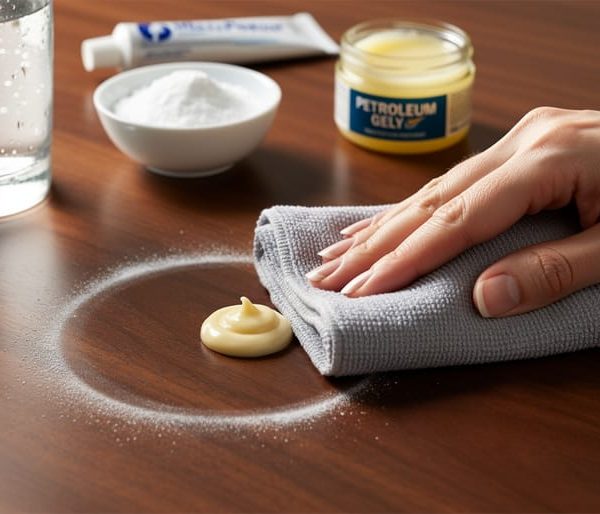
Start by creating a natural cleaning solution using equal parts white vinegar and warm water in a spray bottle. Vinegar’s mild acidity effectively dissolves mineral deposits without harmful fumes. For white scale buildup—those chalky, crusty patches left behind by evaporated hard water—spray the affected area generously and let it sit for 5-10 minutes to break down the minerals.
Using a soft microfiber cloth, gently blot the dampened area rather than rubbing, which can spread the stain or damage paint. Work from the outside edges toward the center to prevent enlarging the affected area. For stubborn spots, you may need to repeat this process several times.
If vinegar alone doesn’t work, mix a few drops of mild, biodegradable dish detergent with warm water as an alternative. Apply with a soft sponge and rinse by blotting with a clean, damp cloth. Always finish by patting the area dry with a clean towel to prevent new water rings from forming.
Remember, while these methods address the visible problem, the minerals causing these spots indicate hard water throughout your home. Addressing water quality at the source prevents recurring ceiling stains and protects your plumbing, appliances, and fixtures from long-term mineral buildup damage.
Tackling Stubborn Stains and Set-In Marks
When water spots have lingered for months or years, they penetrate deeper into ceiling materials and require more aggressive treatment. These stubborn stains often contain mineral deposits from hard water that have essentially bonded with your ceiling surface, making simple cleaning ineffective.
Start by mixing a solution of equal parts white vinegar and water in a spray bottle. The mild acidity helps dissolve hardened mineral deposits without harsh chemicals. Spray generously on the stain and let it sit for 15-20 minutes before scrubbing with a stiff-bristled brush. For particularly resistant marks, make a paste using baking soda and water, apply it to the stain, and gently work it in circular motions. This eco-friendly abrasive action can lift embedded discoloration without damaging your ceiling.
If cleaning fails to restore your ceiling’s appearance, you’ll need to repaint. However, painting directly over water stains rarely works—the discoloration bleeds through. This is where stain-blocking primers become essential. These specialized primers create a sealed barrier that prevents old stains from showing through new paint. Choose a water-based, low-VOC primer to minimize indoor air pollution and support healthier living spaces.
Apply the primer with a roller, ensuring complete coverage over the stained area plus a few inches beyond. Once dried, typically within an hour, you can apply your topcoat. Remember that addressing the underlying water quality issue—whether through fixing leaks or installing water softening systems—prevents future staining problems and protects your home’s surfaces from mineral buildup long-term.
Fixing the Root Cause: Addressing Your Water Quality
Testing Your Water Hardness
Testing your water’s hardness at home is straightforward and helps identify potential causes of ceiling water spots. The simplest method uses inexpensive test strips available at hardware stores or online. Dip the strip in your water sample, wait for the color change, and compare it against the provided chart. Results are measured in grains per gallon (gpg) or parts per million (ppm).
Water is considered soft at 0-3 gpg, slightly hard at 3-7 gpg, moderately hard at 7-10 gpg, and hard above 10 gpg. Very hard water exceeding 14 gpg creates the most stubborn mineral deposits and scale buildup on ceilings and fixtures.
Another quick test involves filling a clear bottle halfway with water, adding several drops of dish soap, then shaking vigorously. Soft water produces abundant, lasting suds, while hard water creates minimal bubbles with cloudy residue from mineral interference.
Understanding your water hardness level connects directly to preventing water quality issues throughout your home. Hard water accelerates mineral accumulation in pipes, reduces appliance efficiency, and causes those frustrating white spots on ceilings. Armed with test results, you can make informed decisions about water treatment solutions that protect your home while supporting sustainable living practices.
Water Softening Solutions That Prevent Scale Buildup
Preventing water spots from reappearing requires addressing the root cause: mineral-rich hard water. Several treatment options can significantly reduce scale buildup on your ceilings, fixtures, and appliances.
Traditional water softeners use ion exchange technology to remove calcium and magnesium, the primary culprits behind water spots. These systems replace hard minerals with sodium ions, producing softened water throughout your home. While highly effective, they require regular salt additions and periodic maintenance. The softened water prevents mineral deposits from forming, protecting both visible surfaces and your plumbing infrastructure.
Salt-free water conditioners offer an eco-friendly alternative that doesn’t remove minerals but instead alters their structure to prevent them from adhering to surfaces. These systems crystallize minerals so they remain suspended in water rather than forming scale. They’re particularly appealing for environmentally-conscious homeowners since they don’t require electricity, produce no wastewater, and need minimal maintenance. While they won’t completely eliminate spots, they dramatically reduce their severity.
Whole-house filtration systems represent cutting-edge solutions that combine multiple technologies. These comprehensive systems can address hard water minerals alongside other contaminants like chlorine, sediment, and heavy metals. By treating water at the point of entry, they protect your entire home from scale buildup while improving overall water quality for drinking, cooking, and bathing.
Choosing the right system depends on your water’s mineral content, household size, and environmental priorities. Consider getting a water test to determine hardness levels before investing in treatment solutions.

Eco-Friendly Water Treatment Options
Preventing hard water spots at their source protects both your ceiling and the environment. Template-assisted crystallization (TAC) systems offer a chemical-free solution by transforming dissolved minerals into harmless microscopic crystals that flow through your pipes without forming scale. Unlike traditional water softeners, TAC systems don’t require salt, electricity, or wastewater discharge, making them exceptionally eco-friendly.
Reverse osmosis (RO) systems provide another sustainable option by filtering out up to 99% of dissolved minerals and contaminants. Modern RO units have become more water-efficient, with some models recovering significantly more treated water than older versions. While they do produce some wastewater, the long-term benefits include reduced cleaning chemical use and extended appliance lifespan.
Both systems address the root cause of mineral deposits, meaning fewer ceiling stains, less frequent cleaning, and reduced environmental impact from harsh cleaning products. By investing in whole-house water treatment, you’re taking a proactive approach to home maintenance while supporting a healthier planet.
Preventing Future Ceiling Water Spots
Regular Maintenance Checks
Prevention is always more cost-effective than repairs, and establishing a regular maintenance schedule helps you catch potential water problems before they create ceiling stains. Inspect your plumbing fixtures quarterly, checking under sinks, around toilets, and behind appliances for signs of moisture or mineral buildup. Hard water deposits around connections often signal slow leaks that eventually lead to ceiling damage.
Examine your roof twice yearly, particularly after severe weather. Look for missing shingles, damaged flashing, and clogged gutters that force water into unwanted areas. Inside your attic, check for daylight penetrating through the roof boards and feel insulation for dampness during rainy periods.
Pay special attention to bathroom and kitchen ceiling areas where moisture naturally accumulates. Install a humidity monitor to ensure proper ventilation is working effectively. Excess humidity not only promotes water spot formation but also encourages mold growth that affects your family’s health.
Consider this maintenance routine an investment in your home’s longevity and your water quality awareness. By staying proactive, you’ll protect your ceiling while developing a better understanding of how water moves through your home’s systems, leading to more informed decisions about water treatment and conservation practices.
Improving Ventilation to Reduce Condensation
Proper ventilation is your first line of defense against moisture-related water spots on ceilings. Bathrooms and kitchens generate significant humidity during everyday activities like showering, cooking, and running hot water. When this moisture-laden air can’t escape, it rises and condenses on cooler ceiling surfaces, leaving behind mineral deposits from your water supply.
Install or upgrade exhaust fans in these high-moisture areas, ensuring they’re adequately sized for the room. A good rule of thumb is one cubic foot per minute of ventilation for every square foot of bathroom space. Run exhaust fans for at least 20 minutes after showering or cooking to fully expel humid air. For sustainable operation, consider energy-efficient models with humidity sensors that activate automatically when moisture levels rise.
Opening windows while cooking or bathing provides natural ventilation and reduces your carbon footprint. During colder months, even cracking a window for a few minutes helps balance indoor humidity levels without significantly impacting heating costs.
Remember that hard water minerals intensify spotting when moisture evaporates. Improving air circulation prevents condensation from forming in the first place, stopping those unsightly ceiling stains before they start. This simple, eco-friendly approach protects your home while reducing the need for frequent cleaning and harsh chemical solutions.
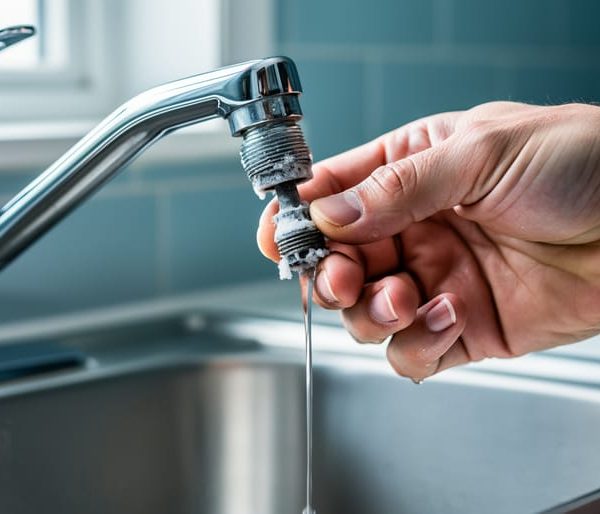
Installing Point-of-Use Filters
For a targeted approach to reducing mineral buildup at specific locations, consider installing point-of-use filters near problematic fixtures like bathroom faucets and showerheads. These compact filtration devices attach directly to individual water outlets, capturing calcium, magnesium, and other minerals before they can evaporate and leave spots on your ceiling. Unlike whole-house systems, point-of-use filters offer an affordable, eco-friendly solution that requires minimal installation and no professional plumbing. They’re particularly effective in bathrooms where steam carries mineral-laden water vapor upward. Most filters use replaceable cartridges that last three to six months, making maintenance simple and sustainable. This preventive strategy not only protects your ceiling from future water spots but also extends the life of your fixtures while reducing cleaning chemical use, aligning with environmentally responsible household practices.
When to Call a Professional
While many water spots can be addressed with DIY solutions, certain situations require professional expertise to prevent serious damage to your home. If you notice water spots that continuously reappear after cleaning, this signals an ongoing leak that needs immediate attention. Similarly, spots accompanied by sagging, bulging, or soft ceiling areas indicate potential structural damage that could lead to collapse if ignored.
Call a professional plumber immediately if water spots appear suddenly after heavy rain, expand rapidly in size, or are accompanied by dripping water or musty odors suggesting mold growth. Dark brown or yellowish stains often point to active leaks from pipes, roofs, or HVAC systems that DIY fixes won’t resolve. These issues can compromise your home’s structural integrity and create unhealthy living conditions.
Beyond emergency repairs, persistent white or crusty water spots may indicate hard water problems affecting your entire plumbing system. Water quality specialists can test your water and recommend whole-house filtration or softening systems that prevent mineral buildup throughout your home. These sustainable solutions not only eliminate ceiling stains but also extend appliance lifespan, reduce cleaning product usage, and improve water efficiency—aligning with eco-conscious living principles.
If you’re unsure about the severity of your ceiling spots, it’s always safer to consult professionals. Early intervention prevents costly repairs and protects your family’s health and safety.
Water spots on your ceiling are more than just an eyesore—they’re messengers alerting you to deeper issues within your home’s water system and structural integrity. While addressing the visible stains is important for maintaining your home’s appearance, it’s equally crucial to investigate what’s happening beneath the surface. Whether those spots stem from a hidden leak, roof damage, or mineral deposits from hard water, each scenario points to an opportunity for improvement.
By tackling both the symptom and the source, you’re not just patching a problem—you’re investing in a healthier living environment. Poor water quality can affect everything from your plumbing fixtures to your family’s wellbeing, while unresolved leaks waste precious resources and can lead to mold growth that compromises indoor air quality. When you take action to test and improve your water quality, you’re embracing a more sustainable approach to homeownership that benefits both your household and the environment.
Don’t wait for water spots to multiply or for minor issues to become major repairs. Take the proactive step of having your water tested to understand what’s flowing through your pipes. This simple action empowers you to make informed decisions about water treatment solutions that can prevent future staining, extend the life of your appliances, and contribute to a cleaner, greener home. Your ceiling—and your peace of mind—will thank you.