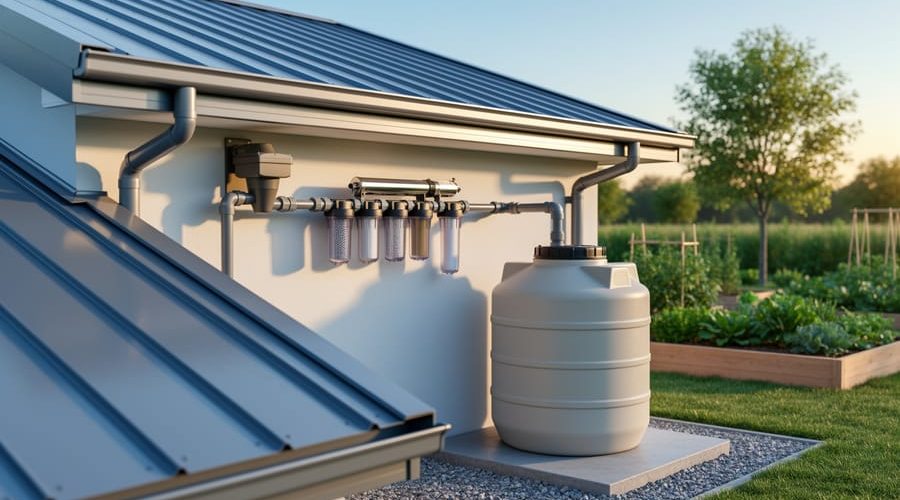
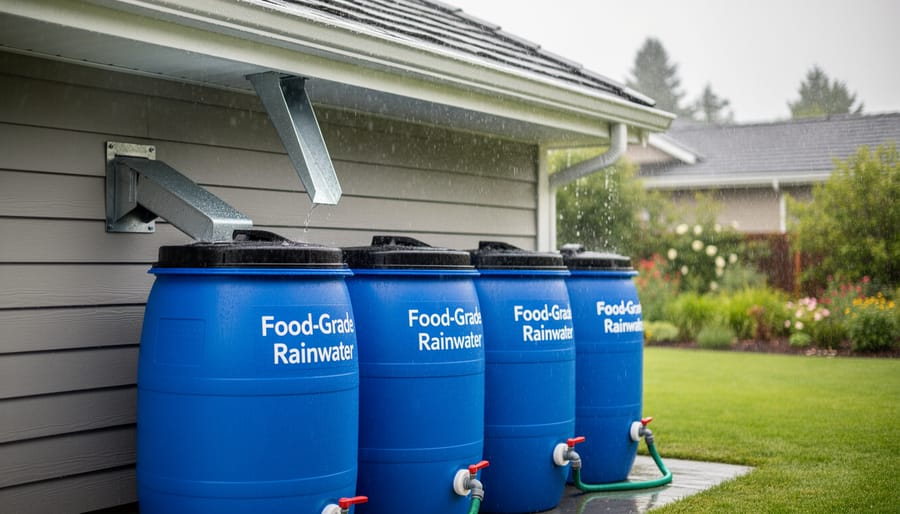
Collect rainwater in food-grade storage tanks positioned to capture runoff from clean roof surfaces, ensuring your gutters are free of debris and contamination sources like overhanging tree branches. Install a first-flush diverter to discard the initial dirty water from each rain event, which carries most pollutants, dust, and bird droppings that accumulate on your roof between storms.
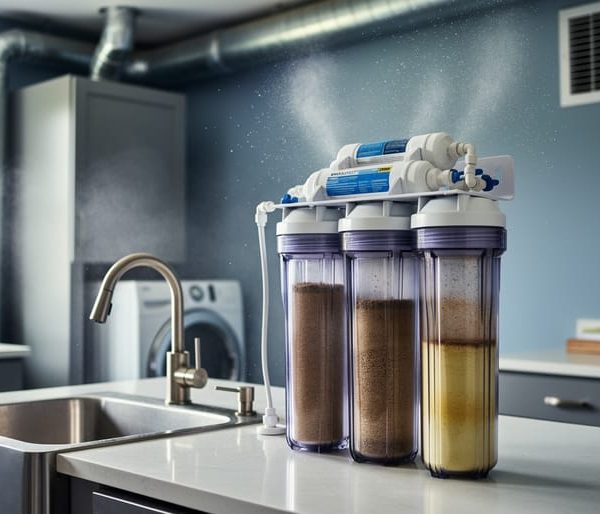
Filter collected water through multiple stages, starting with mesh screens to remove leaves and large particles, followed by sediment filters rated at 5 microns or finer to eliminate microscopic contaminants. For drinking purposes, add UV sterilization or a quality reverse osmosis system as your final treatment barrier against bacteria, viruses, and dissolved chemicals that basic filtration cannot remove.
Test your harvested water quarterly through certified laboratories for coliform bacteria, pH levels, and heavy metals to verify safety standards are met. Many homeowners discover their rainwater quality surpasses municipal tap water once properly treated, though results vary based on local air quality and roof materials.
Understanding rainwater harvesting basics helps you recognize that drinking rainwater safely requires commitment to system maintenance and water quality monitoring. Your storage tanks need annual cleaning, filters require regular replacement according to manufacturer specifications, and UV bulbs lose effectiveness after 12 months of continuous operation.
The upfront investment in treatment equipment ranges from $2,000 to $8,000 for household systems, but delivers long-term water independence and reduced utility bills. Local regulations vary significantly, with some jurisdictions actively encouraging rainwater use for potable purposes while others restrict it, making permit research essential before installation begins.
Why Rainwater Makes Excellent Drinking Water (When Done Right)
Rainwater begins as some of the purest water available in nature. As it forms in the atmosphere, it’s naturally distilled, meaning it hasn’t yet picked up the contaminants, chemicals, or minerals found in ground and surface water sources. This gives properly harvested and treated rainwater several advantages over conventional water supplies.
One of the most noticeable benefits is its natural softness. Unlike municipal water or well water, rainwater contains minimal dissolved minerals like calcium and magnesium. This means less soap scum buildup, softer skin and hair after washing, and longer-lasting appliances. Your coffee and tea may even taste better without the mineral interference.
Rainwater also arrives free from the chlorine and fluoride commonly added to municipal supplies. While these additives serve public health purposes in city water systems, many homeowners prefer water without them for drinking and cooking. Additionally, you won’t find the pharmaceutical residues, industrial chemicals, or agricultural runoff that increasingly concern people about conventional water sources.
However, it’s important to set realistic expectations. Rainwater doesn’t fall from the sky ready to drink. As it travels across your roof and through collection systems, it can pick up contaminants like bird droppings, dust, pollen, and airborne pollutants. The common misconception that “rainwater is automatically pure” has led to safety issues for unprepared households.
The truth is that rainwater’s initial purity gives you an excellent starting point, but proper treatment is non-negotiable for drinking purposes. Think of it this way: you’re beginning with cleaner source water than many municipal systems, which means your filtration and purification efforts can be highly effective with the right approach.
Modern innovations in home water treatment have made it entirely feasible to transform harvested rainwater into drinking water that meets or exceeds safety standards. The key is understanding that rainwater’s natural advantages don’t eliminate the need for proper collection, filtration, and ongoing maintenance—they simply give you a head start on water quality.
The Essential Components of a Drinking-Quality Rainwater System
Catchment Surface: Choosing the Right Roof Material
Your roof is the foundation of a safe rainwater harvesting system, and choosing the right material makes all the difference for drinking water quality. The best options include metal roofing (such as galvanized steel, aluminum, or coated metal), slate, and ceramic or concrete tiles. These materials don’t leach harmful chemicals into your water and are easy to keep clean.
Avoid asphalt shingles, which can release petroleum-based compounds and granules into collected water. Treated wood shakes or shingles should also be skipped, as they contain preservatives that contaminate runoff. Similarly, roofs with lead flashing or copper treatments aren’t ideal for potable water collection.
Before starting your system, give your roof a thorough cleaning to remove accumulated debris, bird droppings, and pollutants. Installing gutter guards helps minimize ongoing contamination from leaves and organic matter. Regular maintenance is essential: inspect and clean your roof and gutters at least twice yearly, and after major storms.
A first-flush diverter is a smart addition that automatically discards the initial runoff from each rain event, which carries the most contaminants. This simple device significantly improves the quality of water entering your storage tanks. Remember, even with the right roof material, proper filtration and treatment remain necessary to ensure your harvested rainwater is truly safe for drinking.
Gutters and First-Flush Diverters
Clean gutters form the foundation of safe rainwater harvesting. Before rainwater reaches your storage tank, it flows across your roof and through gutter collection systems, picking up leaves, bird droppings, dust, and other contaminants along the way. Regular gutter cleaning is essential, but even spotless gutters can’t prevent the initial dirty water that accumulates between rain events.
This is where first-flush diverters become game-changers for water quality. These simple yet innovative devices automatically divert the first 10-20 gallons of each rainfall away from your storage tank. Think of it as nature’s rinse cycle, washing away the concentrated pollutants that collect on your roof between storms. The diverter fills a separate chamber with this contaminated water, then redirects subsequent cleaner rainfall into your main storage tank.
Most first-flush systems use a float valve or tipping mechanism that resets after each rain event, requiring minimal maintenance. This straightforward technology dramatically reduces sediment, bacteria, and chemical contaminants entering your storage system, making downstream filtration much more effective and extending the life of your treatment equipment.
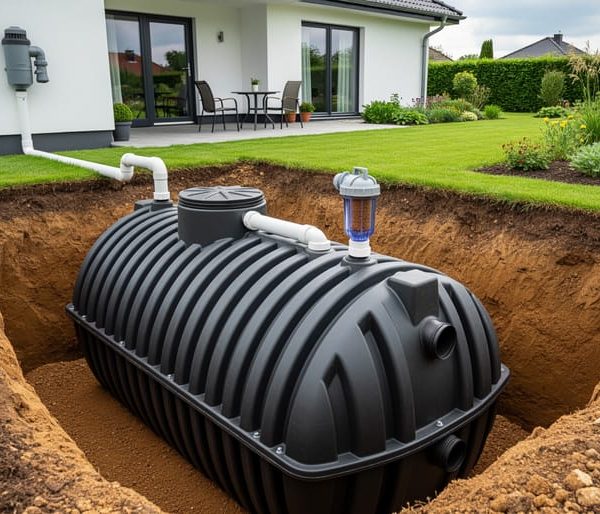
Storage Tanks That Keep Water Fresh
Choosing the right storage tank is critical for keeping your harvested rainwater fresh and safe for drinking. Food-grade storage tanks are non-negotiable here—these containers are specifically manufactured from materials that won’t leach chemicals into your water. Look for tanks made from FDA-approved polyethylene or similar certified materials, clearly labeled as suitable for potable water storage.
Sizing your tank properly depends on your household’s daily water consumption and local rainfall patterns. A typical family of four uses about 300-400 gallons daily, though rainwater drinking systems usually supplement rather than replace municipal water. When planning a large rainwater harvesting system, calculate your needs by considering how many days of water independence you want during dry periods.
Contamination prevention features are essential. Sealed, airtight lids keep insects, debris, and airborne contaminants out while preventing mosquitoes from breeding inside. Quality tanks include properly designed overflow systems that direct excess water away from your foundation without allowing backflow contamination. Dark or opaque interiors are particularly important—they block sunlight that would otherwise fuel algae growth, keeping your stored water cleaner longer.
Additional features to consider include screened vents that allow pressure equalization while blocking pests, smooth interior surfaces that resist bacterial buildup, and access ports positioned for easy cleaning. Elevating tanks off the ground improves water pressure and prevents bottom corrosion. These seemingly small details make the difference between water that stays fresh for months and water that quickly becomes unsuitable for drinking.
Multi-Stage Filtration: Your Path to Pure Water
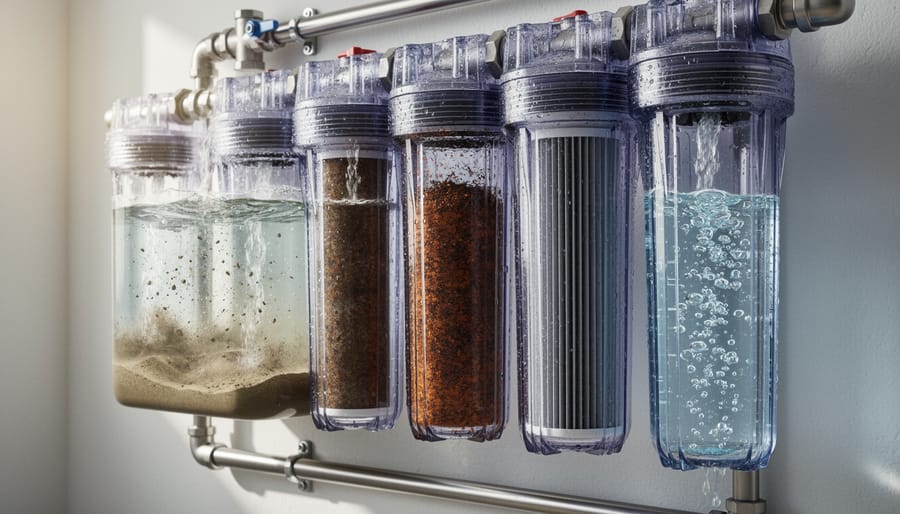
Transforming rainwater into safe drinking water requires a multi-layered approach that removes everything from visible debris to microscopic pathogens. Think of it as a security system with multiple checkpoints, where each stage catches what the previous one missed.
The first line of defense is sediment filtration, which removes larger particles like leaves, dust, sand, and rust. These filters typically use pleated materials or spun polypropylene to catch debris down to 5-10 microns. Without this stage, these particles would quickly clog your more expensive filters downstream and potentially harbor bacteria.
Next comes activated carbon filtration, the workhorse that tackles chemical contaminants. Carbon filters remove chlorine, pesticides, herbicides, volatile organic compounds, and unpleasant tastes or odors. The porous structure of activated carbon acts like a magnet, trapping these unwanted substances as water flows through. This stage is essential because rainwater can pick up atmospheric pollutants and chemicals from your roof surface.
The final and most critical stage addresses biological threats. UV sterilization uses ultraviolet light to destroy bacteria, viruses, and parasites by damaging their DNA, making them unable to reproduce or cause illness. Alternatively, reverse osmosis systems force water through an extremely fine membrane that physically blocks contaminants, including heavy metals and dissolved solids.
Both pathogen-removal methods are highly effective, though reverse osmosis is more thorough and removes a broader range of contaminants. UV systems are typically more affordable and waste less water, making them popular for eco-conscious homeowners. Whichever you choose, never skip this final stage because invisible microorganisms pose the greatest health risk in untreated rainwater.
Treatment Methods That Make Rainwater Safe to Drink
UV Purification: Killing Bacteria Without Chemicals
UV purification offers a chemical-free solution that’s gaining popularity among eco-conscious homeowners. These systems use ultraviolet light at a specific wavelength (254 nanometers) to destroy the DNA of harmful microorganisms, rendering them unable to reproduce or cause illness. Think of it as a microscopic defense system that neutralizes bacteria, viruses, and protozoa as water flows past the UV lamp.
The effectiveness is impressive—properly sized UV systems eliminate 99.99% of pathogens within seconds. However, they work best when paired with good pre-filtration. Sediment and cloudiness can shield microorganisms from UV light, reducing effectiveness. That’s why pre-filtering your rainwater through sediment filters is essential before UV treatment.
Maintenance is straightforward but necessary. You’ll need to replace the UV bulb annually (even if still glowing, effectiveness diminishes over time) and clean the protective quartz sleeve quarterly to remove mineral buildup. Most systems include monitoring lights that alert you when service is needed.
Cost-wise, expect to invest between 300 to 800 dollars for residential systems, with annual bulb replacements running 50 to 150 dollars. While requiring electricity to operate, UV systems add no taste or chemicals to your water—making them an excellent choice for health-conscious households seeking pure, natural-tasting rainwater.
Reverse Osmosis for Maximum Purity
Reverse osmosis represents the gold standard for rainwater purification, removing up to 99% of contaminants including bacteria, viruses, heavy metals, and dissolved solids. This technology forces water through an extremely fine membrane that blocks virtually everything except pure water molecules, delivering pristine drinking water that rivals or exceeds bottled water quality.
For rainwater systems, RO provides peace of mind by addressing even the tiniest impurities that other filters might miss. It’s particularly valuable if your catchment area is near pollution sources, industrial zones, or you simply want the highest possible water quality for your family.
However, there’s an important trade-off to consider. RO systems typically waste 3-4 gallons of water for every gallon of purified water produced, which may feel counterproductive when you’re conserving rainwater. Modern high-efficiency models reduce this ratio, and some homeowners recycle the wastewater for gardens or toilet flushing.
RO filters also require periodic replacement and remove beneficial minerals, so some users add a remineralization stage afterward. While the upfront investment is higher than standard filtration, the exceptional purity makes RO worthwhile for households prioritizing drinking water safety above all else, especially when combined with pre-filtration to extend membrane life.
Ceramic Filters and Other Backup Options
For homeowners seeking simpler, more affordable filtration methods or preparing for off-grid scenarios, several backup options provide reliable water purification without electricity or complex maintenance.
Gravity-fed ceramic filters represent one of the most practical alternatives for rainwater treatment. These systems use porous ceramic candles containing microscopic pores that physically trap bacteria, sediment, and protozoa as water passes through. Many ceramic filters incorporate silver-impregnated elements that provide additional antibacterial protection. The beauty of these systems lies in their simplicity: you simply pour collected rainwater into an upper chamber, and gravity pulls clean water through the ceramic elements into a lower storage container. Popular among preparedness-minded homeowners, ceramic filters require no power, have replaceable elements lasting 6-12 months, and cost significantly less than whole-house systems.
Multi-media filters offer another straightforward approach, combining layers of different filtering materials like sand, gravel, activated carbon, and sometimes specialized media. Water percolates through these layers, with each material targeting specific contaminants. These filters excel at removing sediment, chlorine, and organic compounds while improving taste and odor.
Portable camping-style filters with advanced hollow-fiber membranes have also gained attention as emergency backup options. Though designed for smaller volumes, they provide micron-level filtration capable of removing bacteria and parasites.
While these alternatives work well for basic purification, remember they have limitations. Most don’t eliminate viruses or dissolved chemicals, so combining methods or adding UV sterilization creates more comprehensive protection. These backup systems shine during power outages or as supplementary treatment, ensuring your household maintains access to safe drinking water under any circumstances.
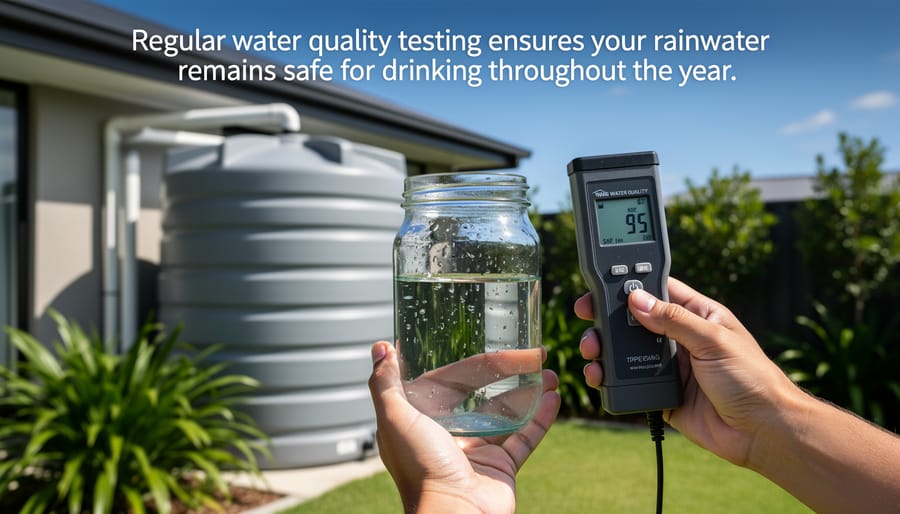
Testing and Monitoring: Keeping Your Water Safe Year-Round
Regular testing is the cornerstone of ensuring your harvested rainwater remains safe to drink. Think of it as a health checkup for your water system—essential for catching potential problems before they affect your family’s wellbeing.
For drinking water from rainwater harvesting systems, test at minimum quarterly throughout the year. However, increase testing frequency to monthly during your area’s rainy season when your system sees the most use. After any significant weather event, extended period of no rain, or system maintenance, conduct additional tests to verify water quality hasn’t been compromised.
The key parameters to monitor include bacterial contamination, particularly E. coli and total coliform bacteria, which indicate fecal contamination. These are your most critical tests since harmful bacteria pose immediate health risks. pH levels should fall between 6.5 and 8.5 for safe drinking water. Turbidity measures cloudiness and indicates how well your filtration system is performing—lower numbers mean clearer, cleaner water. Heavy metals like lead, copper, and zinc can leach from roofing materials or plumbing, so annual testing for these contaminants is wise, especially if you have metal roof components.
DIY testing kits offer a convenient, budget-friendly option for routine monitoring. These typically cost between fifteen and fifty dollars and provide quick results for bacteria, pH, and chlorine levels right at home. They’re perfect for frequent checks and give you peace of mind between professional tests. However, they have limitations in accuracy and can’t detect all contaminants.
For comprehensive analysis, send samples to certified water testing laboratories annually. Lab tests cost between one hundred and three hundred dollars but deliver precise measurements across a full spectrum of potential contaminants, including heavy metals, pesticides, and chemical compounds that home kits miss.
Interpreting results becomes straightforward once you understand the benchmarks. Compare your findings against EPA drinking water standards or your local health department guidelines. If bacterial counts exceed zero, or any parameter falls outside safe ranges, stop drinking the water immediately and investigate the cause. Common culprits include filter replacement needs, contaminated roof surfaces, or compromised storage tanks.
Seasonal considerations matter significantly. Spring often brings pollen and debris accumulation, while fall introduces leaf matter. Winter may reduce water usage, allowing sediment to settle in tanks. Adjust your monitoring approach to address these seasonal changes, maintaining vigilant oversight of your drinking water quality year-round.
Maintenance Schedule That Protects Your Investment
A well-maintained rainwater harvesting system is essential for protecting your investment and ensuring consistently safe drinking water. Think of maintenance as your insurance policy—a small time commitment now prevents costly repairs and health concerns later.
Your seasonal maintenance calendar should begin each spring with a thorough roof inspection. Check for debris accumulation, damaged shingles, and signs of animal activity. Budget approximately 2-3 hours and $50-100 for cleaning supplies. This prevents contaminants from entering your collection system during heavy rainfall seasons.
Monthly tasks keep your system running smoothly. Inspect gutters and first-flush diverters for leaves, dirt, and blockages—a 30-minute task requiring only basic tools. Check pre-filters and replace or clean them according to manufacturer specifications, typically every 1-3 months depending on your environment. Pre-filter cartridges range from $15-40 each, making this an affordable but crucial expense.
Quarterly maintenance focuses on your filtration system. Sediment filters generally need replacement every three months (cost: $20-50), while carbon filters last 6-12 months ($40-80). UV lamp replacement is annual, running $80-150. Mark these dates on your calendar to avoid lapses in treatment effectiveness.
Every six months, conduct a comprehensive tank inspection. Check for sediment buildup at the bottom, inspect seals and connections for leaks, and verify your overflow system functions properly. This 1-2 hour inspection catches small problems before they become expensive failures.
Annual deep cleaning and sanitization represent your most significant maintenance investment. Professional tank cleaning costs $200-500, or you can DIY with food-grade hydrogen peroxide following established protocols. This is also when you should conduct water quality testing ($100-300 for comprehensive analysis) to verify your treatment methods remain effective.
Document everything in a maintenance log. This simple practice helps you track filter lifespans, identify patterns, and maintain warranty coverage. Total annual maintenance costs typically range from $400-800—a reasonable expense considering you’re producing safe, sustainable drinking water while protecting a multi-thousand-dollar system investment.
Real Costs: What You’ll Actually Spend
Let’s talk real numbers. Setting up a rainwater harvesting system for drinking water involves upfront investment, but understanding the costs helps you make an informed decision.
For a basic DIY system serving a small household, expect to spend $2,000-$4,000 initially. This includes a food-grade storage tank, basic filtration, and UV sterilization. Professional installation of a comprehensive system typically ranges from $5,000-$15,000, depending on your home’s size and complexity. Premium systems with advanced filtration can reach $20,000 or more.
The real ongoing expenses come from maintenance and consumables. Plan for $200-$500 annually for filter replacements. Sediment filters need changing every 3-6 months ($20-$40 each), carbon filters annually ($50-$100), and UV bulbs yearly ($80-$150). Water testing should happen quarterly at minimum, costing $50-$150 per test depending on which contaminants you’re checking.
Compare this to bottled water costs. The average family spending $10 weekly on bottled water pays $520 annually, totaling $5,200 over ten years. Meanwhile, a $6,000 rainwater system with $350 yearly maintenance costs $9,500 over that same decade, but provides unlimited clean water for all household uses, not just drinking.
The long-term savings become clearer when you factor in reduced municipal water bills, which can drop 40-50% for households using rainwater for multiple purposes. Most homeowners see payback within 5-10 years, while simultaneously reducing their environmental footprint and gaining water independence. The investment isn’t just financial—it’s a commitment to sustainable living that pays dividends beyond your wallet.
Legal Considerations and Local Regulations
Before investing time and resources into a rainwater harvesting system for drinking water, understanding your local regulations is essential. Laws governing rainwater collection vary dramatically across the United States and around the world, with some areas actively encouraging the practice while others impose strict limitations or require specific permits.
In states like Texas and Ohio, rainwater harvesting is encouraged through incentives and supportive legislation. However, other regions—particularly in the western United States where water rights can be complex—may have restrictions on how much rainwater you can collect or how you can use it. Some jurisdictions differentiate between non-potable uses like irrigation and potable drinking water applications, with the latter requiring more stringent permitting and system requirements.
To research your local regulations, start by contacting your county health department, building department, or water resources agency. Many municipalities now have dedicated information on rainwater harvesting guidelines available on their websites. You may need permits for plumbing modifications, electrical work for pumps, or approval of your treatment system design before installation.
Compliance isn’t just about legality—it directly impacts your safety. Regulations often exist to protect public health by ensuring proper system design, adequate treatment, and regular testing protocols. Working with licensed professionals familiar with local codes can streamline the permitting process and help you design a system that meets both regulatory standards and your household’s needs. Taking this step seriously from the outset prevents costly modifications later and ensures your sustainable water solution operates safely and legally.
Common Mistakes That Compromise Water Quality
Even well-intentioned rainwater harvesting systems can produce unsafe drinking water when certain preventable mistakes occur. Understanding these common pitfalls helps you maintain a system that consistently delivers clean, safe water.
The most frequent oversight is neglecting first-flush diverters. These simple devices discard the initial rainwater that washes debris, bird droppings, and accumulated pollutants from your roof. Without them, these contaminants flow directly into your storage tank, overwhelming your filtration system. The solution is straightforward: install an automatic first-flush diverter that diverts approximately the first 10 gallons per 1,000 square feet of roof area.
Inadequate filtration ranks as another critical error. Many homeowners rely solely on basic sediment filters, which can’t remove bacteria, viruses, or dissolved chemicals. This creates a false sense of security that may lead to waterborne illness. A multi-stage approach combining sediment filtration, activated carbon, and UV sterilization or reverse osmosis provides comprehensive protection against both visible and microscopic threats.
Poor tank maintenance compromises water quality from the inside. Sediment accumulates at tank bottoms, creating breeding grounds for bacteria and algae. Tanks should be drained and cleaned annually, with inspections checking for cracks, leaks, or light penetration that encourages algae growth. Opaque, food-grade tanks with secure, screened openings prevent most contamination issues.
Perhaps the most dangerous mistake is inconsistent water testing. Assuming your system remains safe without verification puts your health at risk. Test quarterly for bacteria and annually for chemical contaminants, especially after heavy storms or system modifications. Home test kits provide basic monitoring, while professional laboratory analysis offers comprehensive assessment. Regular testing identifies problems before they affect your health, allowing prompt corrective action.
Rainwater harvesting for drinking water is not only possible—it’s a proven, sustainable solution that empowers homeowners to take control of their water supply while reducing environmental impact. With the right combination of proper collection surfaces, effective filtration and purification systems, and consistent testing and maintenance, rainwater can meet or exceed the quality of traditional municipal water sources.
The environmental benefits are substantial. By capturing and using rainwater, you reduce strain on municipal systems, decrease stormwater runoff, and lower your household’s carbon footprint. Beyond sustainability, there’s genuine satisfaction in achieving water independence, knowing your family has access to clean drinking water generated right from your own roof.
Starting your rainwater harvesting journey requires thoughtful planning. Begin by researching local regulations and understanding your household’s water needs. Invest in quality components—particularly filtration systems—and commit to regular water quality testing, especially in the first year. While initial costs may seem significant, many homeowners find the long-term savings and peace of mind well worth the investment.
The path to sustainable self-sufficiency starts with a single step. With proper planning, the right technology, and ongoing attention to water quality, you can confidently embrace rainwater as a safe, reliable drinking water source for your home.