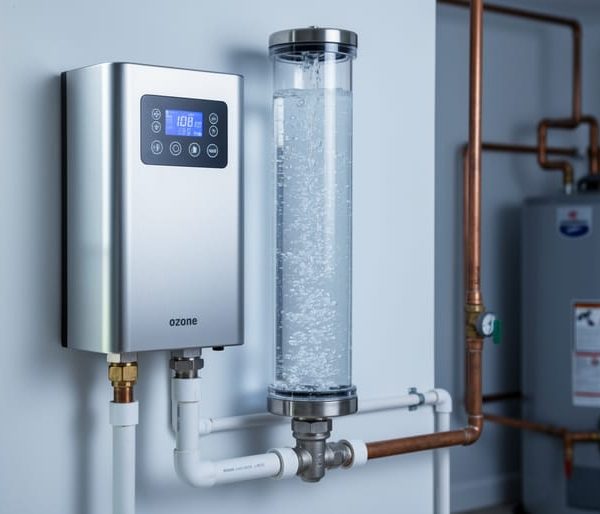
Install your whole house carbon water filter at the main water line entry point before water reaches your heater or branches to different fixtures, ensuring every tap delivers purified water. Position the system in an accessible location like your basement or garage where you can easily swap filters every 6-12 months without hiring a plumber.
Expect to remove chlorine, volatile organic compounds, pesticides, and sediment particles down to 5 microns—transforming municipal water that tastes like a swimming pool into clean, odorless drinking water throughout your entire home. These systems protect your appliances from sediment buildup while eliminating the need for dozens of plastic water bottles each month, reducing both your environmental footprint and long-term costs.
Choose between activated carbon block filters that trap contaminants through absorption or granular activated carbon that allows faster water flow for homes with high demand. Match your filter capacity to your household size—a family of four typically needs a system rated for 10-15 gallons per minute to maintain adequate water pressure during peak usage times like morning showers.
Budget between $300-$1,500 for quality systems depending on filtration stages and flow rates, with annual filter replacements costing $100-$300. This upfront investment pays dividends through cleaner water for cooking, bathing, and drinking while extending the lifespan of water-using appliances by preventing scale and sediment damage. Modern cartridge designs make maintenance straightforward—most homeowners complete filter changes in under 30 minutes using basic tools.
Why Whole House Carbon and Sediment Filters Work Better Together
What Sediment Filters Actually Do
Sediment filters serve as the first line of defense in your whole house filtration system, catching larger particles before water flows to the carbon stage. Think of them as a protective gatekeeper that extends the life of your entire system while improving water clarity throughout your home.
These filters work by trapping visible and microscopic debris as water passes through their carefully engineered mesh or spun material. The effectiveness of a sediment filter depends on its micron rating, which measures the size of particles it can capture. Most residential systems use filters rated between 5 and 20 microns. To put this in perspective, a human hair measures about 70 microns wide, so these filters catch incredibly small particles.
A 20-micron sediment filter removes sand, silt, rust, and larger debris that enter your pipes from aging municipal infrastructure or well water sources. As you move to finer ratings like 10 or 5 microns, the filter captures smaller particles including fine sediment, scale deposits, and even some larger bacteria. This pre-filtration stage prevents these contaminants from clogging your carbon filter, which handles chemical removal but isn’t designed for heavy particulate loads.
By removing sediment first, you’re protecting your investment in the carbon filtration stage while ensuring cleaner, clearer water flows from every tap in your home.
How Carbon Filtration Removes Chemicals and Odors
Activated carbon works through a natural process called adsorption, where contaminants stick to the surface of the carbon material like magnets. Think of activated carbon as an incredibly porous sponge with millions of tiny pockets that trap unwanted substances as water flows through. This material is typically made from coconut shells, coal, or wood that has been heated to extremely high temperatures, creating a vast internal surface area—just one gram can have a surface area equivalent to a football field.
Whole house carbon filters excel at removing chlorine, which municipalities add to disinfect water but leaves behind that distinctive swimming pool smell and taste. They also capture volatile organic compounds (VOCs) like industrial solvents, pesticides from agricultural runoff, herbicides, and various chemical byproducts that can seep into water supplies. These systems effectively reduce harmful substances including benzene, trihalomethanes, and certain pharmaceutical traces.
The result is noticeably better-tasting, fresher-smelling water throughout your entire home. You’ll experience cleaner showers without chlorine drying your skin, better-tasting drinking water and cooking ingredients, and peace of mind knowing your family isn’t exposed to unnecessary chemicals. This eco-friendly filtration method requires no electricity and produces no wastewater, making it a sustainable choice for environmentally-conscious homeowners seeking comprehensive water quality improvement.
Choosing the Right System for Your Home
Understanding Flow Rate Requirements
Choosing the right flow rate for your whole house carbon filter ensures everyone can shower, run the dishwasher, and do laundry simultaneously without experiencing frustrating pressure drops. Flow rate, measured in gallons per minute (GPM), indicates how much water your system can process while maintaining adequate pressure throughout your home.
For a typical household, here’s what you’ll need: smaller homes with 1-2 bathrooms function well with systems rated at 10-15 GPM, while larger families with 3-4 bathrooms should look for filters handling 15-20 GPM or higher. A good rule of thumb is to add up the flow rates of fixtures you might use at once—a shower uses about 2.5 GPM, washing machines around 3 GPM, and kitchen faucets approximately 2 GPM.
Filter size directly impacts both flow rate and pressure. Larger filter housings with bigger carbon cartridges allow water to pass through with less resistance, maintaining stronger pressure. Undersized systems create bottlenecks, resulting in weak showers and slow-filling toilets during peak usage times. When selecting your system, consider both your home’s current water pressure (typically 40-80 PSI) and peak simultaneous water usage to ensure the filter won’t become a limiting factor in your daily routines.
Filter Housing Materials and Durability
When selecting filter housings, you’ll encounter two primary materials: plastic and stainless steel. Plastic housings are budget-friendly and work well for most residential applications, typically rated for 40-60 PSI (pounds per square inch). They’re lightweight, resistant to corrosion, and adequate for standard municipal water pressure. However, plastic can become brittle over time, especially in areas with temperature fluctuations or direct sunlight exposure.
Stainless steel housings offer superior durability and can handle higher pressure ratings of 150 PSI or more, making them ideal for homes with well water systems or fluctuating pressure conditions. They’re particularly valuable in basements prone to humidity or outdoor installations where extreme weather occurs. While pricier upfront, stainless steel resists cracking, withstands physical impacts better, and typically lasts 15-20 years compared to plastic’s 5-10 year lifespan.
For garage or outdoor installations, consider stainless steel to combat temperature extremes and UV exposure. Indoor, climate-controlled locations can safely accommodate plastic housings. Remember that your housing choice affects not just durability but also your system’s ability to maintain consistent water pressure throughout your home, ensuring optimal filtration performance year-round.
Step-by-Step Installation Process
Tools and Materials You’ll Need
Before starting your installation, gather these essential items to ensure a smooth process. You’ll need two adjustable pipe wrenches for loosening and tightening connections without damaging pipes. Teflon tape is crucial for creating watertight seals on threaded fittings, preventing leaks that waste water and reduce system efficiency. A hacksaw or pipe cutter allows you to modify existing plumbing to accommodate your new filter system. Include shut-off valves in your materials list, as they let you isolate the filter for maintenance without shutting down your entire home’s water supply. A bucket and towels handle inevitable drips during installation. Don’t forget mounting brackets specific to your filter housing, plus appropriate filter cartridges matched to your water quality needs. Finally, keep a marker and measuring tape handy for precise placement. Having everything ready beforehand transforms what could be a frustrating project into a manageable weekend DIY task that delivers cleaner, healthier water throughout your home.

Preparing Your Water Line
Before you begin installation, proper preparation of your water line ensures a smooth process and prevents potential headaches. Start by locating your main water shut-off valve, typically found where the municipal water line enters your home near the water meter or pressure tank. Turn this valve clockwise until completely closed to stop water flow throughout your house.
Next, relieve pressure in your lines by opening the lowest faucet in your home, such as a basement sink or outdoor spigot, and the highest faucet, like an upstairs bathroom tap. Let them run until water stops flowing completely. This draining step is essential to prevent spills during installation.
Now identify your optimal installation point. The best location is immediately after your main shut-off valve but before your water heater and any branch lines that supply individual fixtures. This positioning ensures filtered water reaches every tap while protecting your water heater from sediment buildup. Similar to water softener installation, you’ll want adequate space for filter housing access and future cartridge changes. Measure the available area and confirm your filter system will fit comfortably with clearance below for cartridge removal.
Mounting and Connecting the Filter Housings
Installing your whole house carbon filter system begins with securing the mounting brackets to a sturdy wall surface near your main water line. Choose a location that allows easy access for future filter changes and provides adequate clearance above each housing for removing the canisters. Use appropriate anchors for your wall type, ensuring the brackets can support the weight of the filled housings, which can be surprisingly heavy when water-filled.
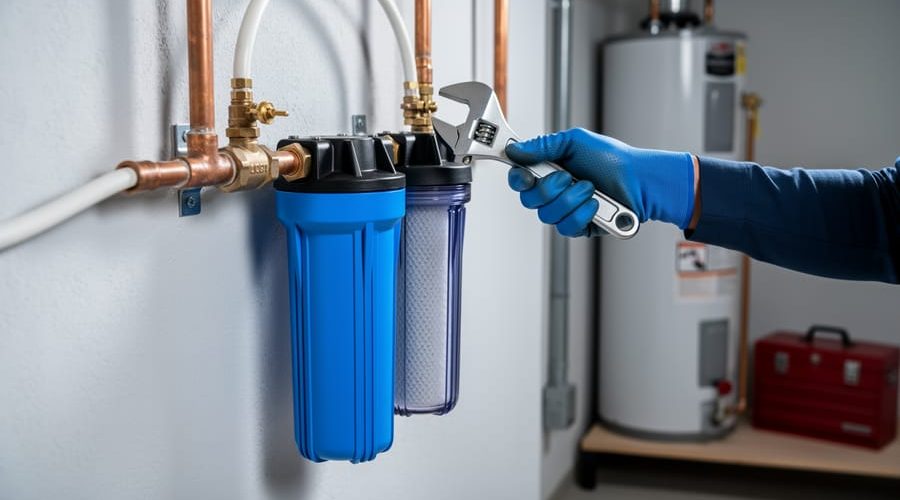
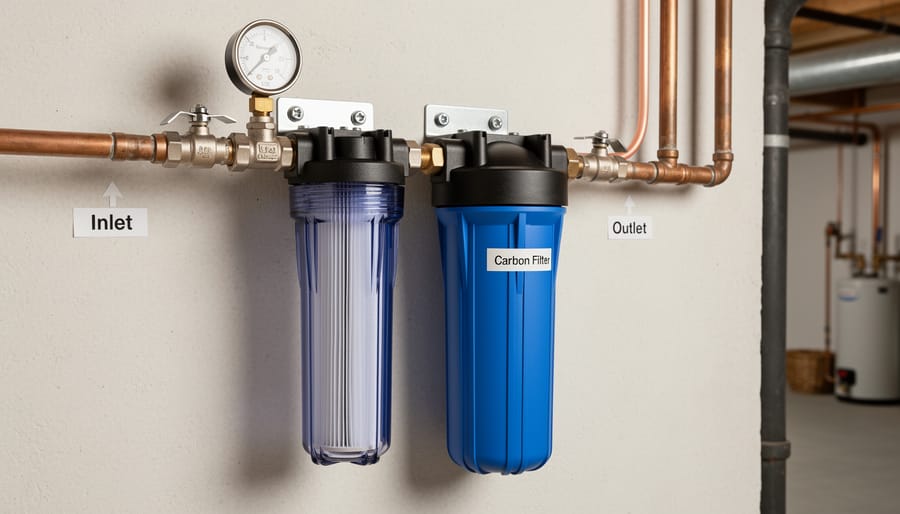
Proper sequencing is essential for optimal filtration. Always install the sediment filter first in the water flow sequence, followed by the carbon filter. This arrangement allows the sediment filter to capture larger particles like sand, rust, and silt before water reaches the carbon stage, protecting the carbon filter from premature clogging and extending its lifespan. Think of it as a two-stage defense system, where each component handles specific contaminants.
Before connecting, verify the flow direction arrows molded into each filter housing. These indicators show which port is inlet and which is outlet. Connecting them backward will severely compromise filtration effectiveness and may damage your system. The inlet port connects to your main water supply, while the outlet feeds into your home’s plumbing.
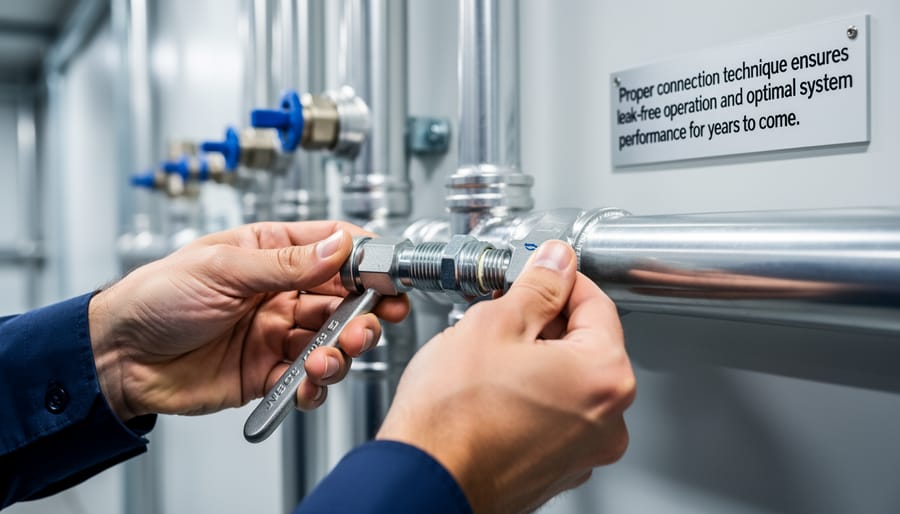
Use thread seal tape on all threaded connections to prevent leaks. Tighten fittings hand-tight first, then use a wrench for an additional quarter turn. Avoid over-tightening, which can crack plastic housings. Once connected, slowly open the main water supply and carefully inspect all connections for leaks. This methodical approach ensures your eco-friendly filtration system operates efficiently from day one, delivering cleaner water throughout your home.
Testing for Leaks and Pressure
Once your whole house carbon filter system is fully installed, it’s time to carefully restore water and check for potential issues. Begin by slowly turning on the main water supply valve—open it gradually rather than all at once to prevent sudden pressure surges that could stress new connections. As water flows through the system, listen carefully for unusual sounds like hissing or dripping.
Systematically inspect every connection point you worked on, including the filter housing, inlet and outlet pipes, and any bypass valves. Run your hand around each joint to feel for moisture, and look underneath for drips. Even minor leaks can waste water and damage your home over time, so address any issues immediately by tightening connections or reapplying thread seal tape.
Next, flush the system to remove any carbon fines or installation debris. Open several faucets throughout your house and let water run for 5-10 minutes until it flows clear without cloudiness or black particles. This initial flush is essential for optimal water quality and protects your appliances.
Finally, verify water pressure at multiple fixtures. Most homes should maintain 40-60 psi. If pressure seems significantly reduced, check that all valves are fully open and confirm you’ve selected an appropriately-sized filter system for your household’s flow rate requirements.
Maintenance Schedule and Filter Replacement
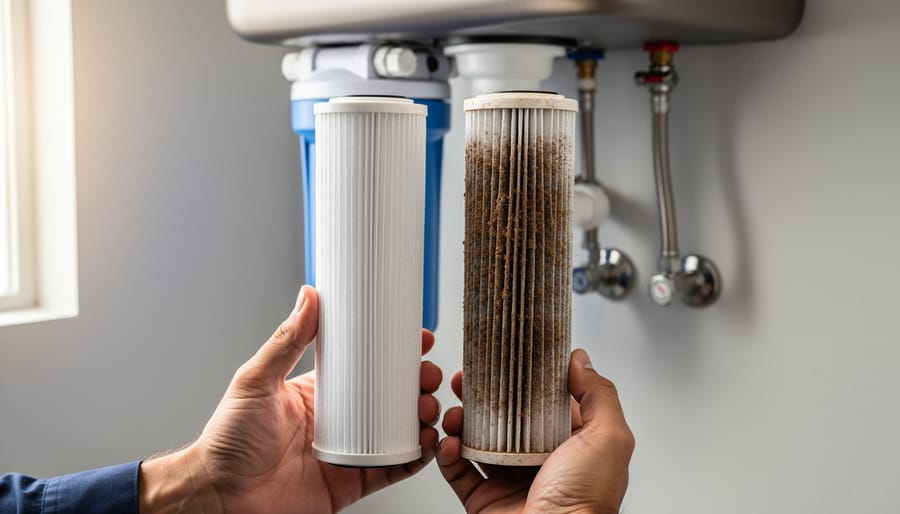
When to Replace Sediment Filters
Sediment filters typically need replacement every three to six months, though your household’s specific water conditions will determine the exact timeline. Homes with well water or areas with higher sediment levels may require more frequent changes, sometimes as often as every two to three months.
The most reliable indicator that your sediment filter needs changing is a noticeable drop in water pressure throughout your home. When sediment accumulates and clogs the filter pores, water struggles to pass through, resulting in weaker flow from faucets and showerheads. This pressure reduction is your filter doing its job—capturing particles before they reach your carbon filter and home plumbing.
Visual inspection also provides clear signals. Remove the filter housing and examine the cartridge. A dirty brown or gray appearance indicates heavy sediment buildup, while a filter that looks crusty or hardened has reached the end of its lifespan. Some modern filters include built-in pressure gauges that alert you when flow restriction becomes problematic.
Don’t wait until water pressure becomes frustratingly low to replace your sediment filter. Establishing a regular replacement schedule protects your carbon filter downstream, extends your system’s lifespan, and ensures consistently clean water for your family. Mark replacement dates on your calendar as a simple reminder to maintain this eco-friendly investment in your home’s water quality.
Carbon Filter Lifespan and Replacement Signs
Carbon filters in whole house systems typically last between 6 to 12 months, though this timeline varies based on your water quality and household usage. Think of activated carbon like a sponge that eventually becomes saturated with contaminants—once it reaches capacity, it can no longer effectively purify your water.
The most obvious sign that your carbon filter needs replacement is the return of chlorine taste or odor in your tap water. You might also notice a decrease in water pressure or a change in water clarity. Some eco-conscious homeowners track their water usage through monthly bills to estimate filter life more accurately.
Several factors influence how long your carbon filter lasts. Homes with heavily chlorinated municipal water or high contaminant levels will exhaust filters more quickly than those with cleaner source water. Larger households that use more water daily will also need more frequent replacements. Water temperature matters too—warmer water can reduce filter effectiveness over time.
To maximize your filter’s lifespan and maintain optimal water quality, consider installing a pre-filter to catch larger particles before they reach the carbon stage. This sustainable approach not only extends your carbon filter’s life but also ensures your family consistently enjoys clean, great-tasting water throughout your home.
How to Change Filters Without Making a Mess
Changing your carbon filters doesn’t have to be a wet, messy ordeal. Start by shutting off your home’s main water supply and opening a nearby faucet to release system pressure—this crucial step prevents water from gushing out when you open the filter housing. Place a large bucket or towels beneath the housing before using the provided wrench to slowly unscrew it counterclockwise. The housing will contain water, so pour it into your bucket before removing the old filter cartridge. Rinse the housing with clean water to remove any sediment buildup, then insert your new filter, ensuring any O-rings are properly seated and lightly lubricated with food-grade silicone. Hand-tighten the housing back into place, restore water pressure gradually, and check for leaks. As for your used carbon filters, they’ve already served the planet by reducing plastic bottle waste—now dispose of them responsibly. Many filters can be recycled or composted depending on their materials, so check manufacturer guidelines for eco-friendly disposal options in your area.
Troubleshooting Common Issues
Solving Low Water Pressure Problems
Experiencing low water pressure after installing your whole house carbon filter system? Let’s identify the culprit. First, check your filter cartridges—clogged filters are the most common cause. Carbon filters typically need replacement every 6-12 months depending on usage and water quality. If you notice pressure dropped gradually over time, your filters likely need changing. Simply replace the cartridges and monitor if pressure returns to normal.
If your system is brand new and pressure was never adequate, you might have an undersized system. Carbon filters naturally create some flow resistance, so systems must match your household’s flow rate requirements. Most homes need systems rated for at least 10-15 gallons per minute. Compare your system’s specifications with your home’s peak water usage—if there’s a mismatch, you may need to upgrade to a larger capacity unit.
Installation issues can also restrict flow. Check that all valves are fully open and inspect for kinked or undersized connecting pipes. Your system should use the same diameter piping as your main water line. Verify the bypass valve isn’t partially closed, which would limit water flow through the filter housing. These simple checks often reveal easy fixes that restore proper pressure throughout your home.
Addressing Leaks and Housing Issues
Even well-installed carbon filtration systems can develop leaks over time, but most issues are straightforward to address. The most common leak points include O-rings at filter housing connections, threaded fittings where pipes connect to the system, and the housing seal where the canister meets its cap.
To identify leaks early, inspect your system monthly by running your hand along connections and checking for moisture. Look for water pooling beneath the unit or mineral deposits that indicate slow drips. Sometimes leaks only appear when water is flowing, so check during active use as well.
O-ring failures cause most leaks and happen when these rubber seals dry out, crack, or shift position. When changing filters, always lubricate O-rings with food-grade silicone grease and inspect them for damage. Replace any worn O-rings immediately—they’re inexpensive insurance against water damage.
For threaded connections, hand-tighten first, then use a wrench for a quarter-turn more. Over-tightening actually increases leak risk by damaging threads or crushing gaskets. If a connection continues leaking, wrap the threads with plumber’s tape before reconnecting.
Prevention beats repair: annually inspect all seals and connections, keep spare O-rings on hand, and ensure your system isn’t exposed to extreme temperature fluctuations that can degrade seals faster. These simple practices protect both your investment and your home.
Environmental Impact and Long-Term Benefits
Installing a whole house carbon water filter system delivers significant environmental benefits that extend far beyond your household. The most immediate impact is the dramatic reduction in plastic bottle waste. An average family of four typically consumes 8-10 bottles of water daily, generating over 3,000 plastic bottles annually. Most of this plastic ends up in landfills or oceans, where it takes 450 years to decompose. With filtered water available from every tap, you eliminate this recurring waste while saving money previously spent on bottled water.
Beyond waste reduction, these systems protect your home’s infrastructure. Carbon filters combined with sediment filtration prevent mineral buildup and corrosion in pipes, which extends plumbing lifespan by 15-20 years on average. Water heaters, washing machines, and dishwashers particularly benefit from filtered water, as sediment and contaminants accelerate wear on heating elements and internal components. This protection translates to fewer appliance replacements and reduced resource consumption over time.
From a cost perspective, the initial investment of $800-2,500 for a quality whole house system pays dividends within 2-3 years. Consider that bottled water costs approximately $1,500 annually for a family of four, while replacement filters typically run $150-300 per year. Additionally, the extended lifespan of appliances and plumbing can save thousands in premature replacement costs.
The broader environmental calculus is equally compelling. Manufacturing plastic bottles requires 17 million barrels of oil annually in the United States alone. By choosing whole house filtration, you directly reduce demand for petroleum-based packaging and the carbon emissions associated with bottling and transportation. This simple upgrade transforms your home into a model of sustainable living while ensuring consistent access to clean, safe drinking water.
Investing in a whole house carbon water filter system is a meaningful step toward cleaner water, better health, and environmental responsibility. By removing sediments, chlorine, and organic contaminants throughout your entire home, you’re protecting your family from unwanted chemicals while extending the life of your plumbing and appliances. The dual benefits of carbon and sediment filtration work together to deliver water that tastes better, smells fresher, and supports your overall well-being.
Beyond the immediate health advantages, choosing a whole-house filtration approach reduces your reliance on single-use plastic bottles, aligning with sustainable living practices that benefit our planet. The cutting-edge innovations in carbon filtration technology make it easier than ever for homeowners to access premium water quality without complicated systems or excessive maintenance.
Remember that proper upkeep is essential for maintaining peak performance. Regular filter replacements and system checks ensure your investment continues delivering clean water for years to come. Whether you’re ready to install your system or simply exploring options, taking action now means investing in your family’s health and contributing to a more sustainable future. Clean water throughout your home isn’t just a luxury—it’s an achievable reality that supports both wellness and environmental stewardship.