Turn off your home’s main water supply and locate your incoming cold water line—this is where your GE water softener will intercept hard water before it reaches your fixtures and appliances. Position the unit on a level surface near a drain and electrical outlet, ensuring you have at least three feet of clearance around it for salt refills and maintenance access.
Cut into your main water line using a pipe cutter, installing the bypass valve assembly that came with your GE system. Connect the inlet side to your incoming water supply and the outlet to your home’s distribution lines, using compression fittings or soldering depending on your plumbing type. This bypass feature lets you redirect water flow during maintenance without shutting down your entire house.
Run the drain line from your softener to a nearby floor drain, laundry sink, or standpipe, positioning it at least two inches above the drain opening to prevent backflow. Keep this line under 20 feet in length and avoid kinking—proper drainage is essential for the regeneration cycles that flush mineral buildup from the resin tank.
Program your GE unit’s control valve by entering your water hardness level, measured in grains per gallon, which you can obtain from your municipal water report or a home testing kit. Set the regeneration schedule based on your household’s daily water usage—typically between 70 to 100 gallons per person—to optimize salt efficiency and ensure consistently soft water. If you’re concerned about sodium intake or environmental impact, explore salt-free alternatives that condition water through different mechanisms.
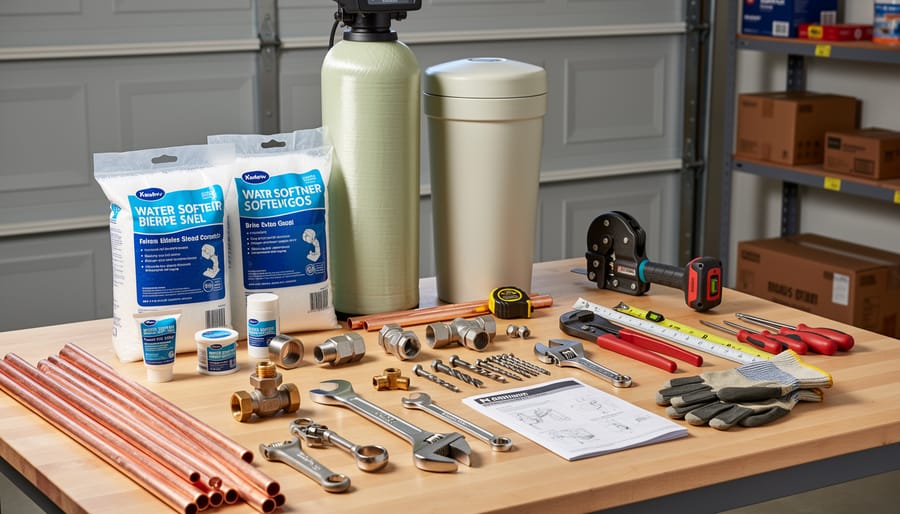
What You Need Before Starting Your GE Water Softener Installation
Essential Tools and Materials
Before beginning your GE water softener installation, gather these essential tools to ensure a smooth setup process. You’ll need adjustable wrenches (10-inch and 12-inch) for tightening pipe connections and fittings. A pipe cutter or hacksaw is necessary for cutting into your existing water supply line—pipe cutters provide cleaner cuts but a hacksaw works as a budget-friendly alternative. Teflon tape (also called plumber’s tape) prevents leaks at threaded connections by creating watertight seals.
A measuring tape ensures accurate spacing between your softener and walls, while a level guarantees proper positioning for optimal water flow. Keep a bucket and towels handy to catch residual water when cutting into pipes. You’ll also need a screwdriver set for securing mounting brackets and connecting drain lines.
For plumbing connections, have bypass valve fittings, flexible stainless steel supply lines, and compression fittings on hand. A drain hose (typically 1/2-inch diameter) routes brine discharge to your wastewater system. Most GE softeners include installation kits with basic fittings, but verify contents before starting.
Budget-conscious homeowners can rent specialized tools like pipe cutters from hardware stores rather than purchasing them outright. This practical approach reduces upfront costs while maintaining professional-quality results for your eco-friendly water treatment system.
Space and Location Requirements
Choosing the right location for your GE water softener ensures optimal performance and longevity while making maintenance easier. Before unpacking your unit, take time to assess your home’s layout and identify a spot that meets all necessary requirements.
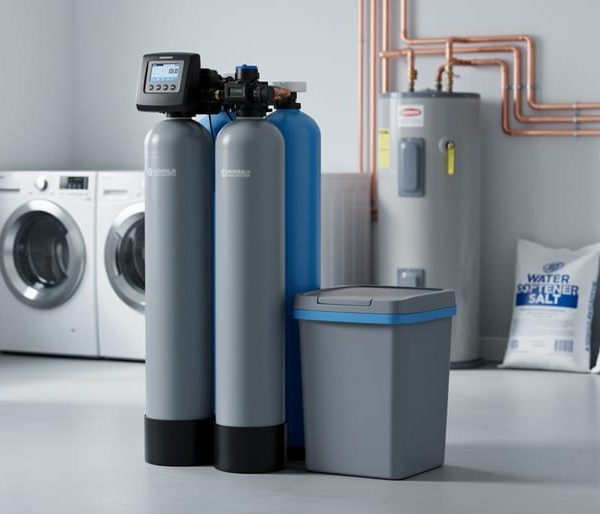
Your water softener needs to be positioned as close as possible to your main water line where it enters your home, typically in a basement, garage, utility room, or crawl space. This placement allows the softener to treat all water flowing through your household plumbing system effectively. Keep in mind that the unit must remain level on a stable surface to function properly.
For most GE water softener models, you’ll need approximately 10 to 15 inches of clearance on all sides for servicing and salt refilling. Standard units measure roughly 18 to 24 inches wide and 40 to 50 inches tall, though compact models are available for tighter spaces. Always verify your specific model’s dimensions before finalizing placement.
Essential utilities must be within reach. A drain access point for the brine discharge is crucial, whether it’s a floor drain, utility sink, or standpipe. The drain should be within 20 feet of the softener, and positioned lower than the control valve to ensure proper drainage flow. Additionally, you’ll need a standard 120-volt electrical outlet nearby to power the system’s control panel and regeneration cycles.
Temperature also matters for eco-friendly operation. Install your softener in a climate-controlled area where temperatures remain between 35 and 100 degrees Fahrenheit. Freezing conditions can damage internal components and reduce the unit’s efficiency, potentially wasting water and salt during regeneration cycles.
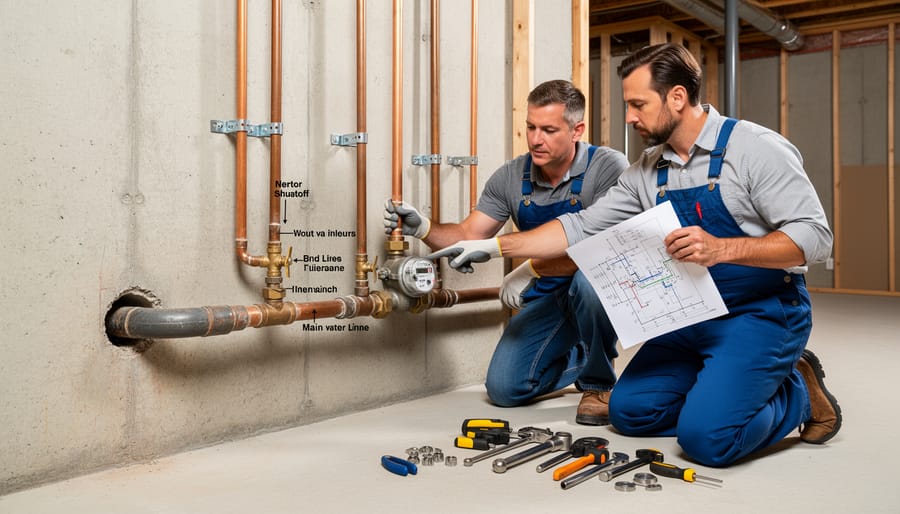
Understanding Your GE Water Softener’s Plumbing Connections
Main Water Line Connection Points
Understanding where and how your GE water softener connects to your home’s plumbing is essential for proper installation and long-term performance. The main water line connection involves three key ports that work together to soften your household water effectively.
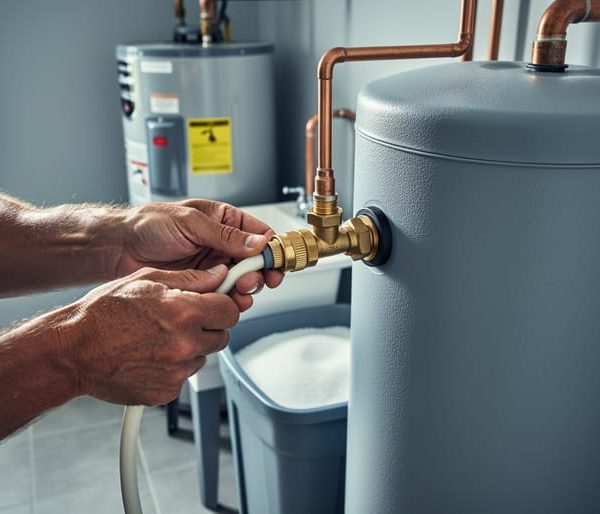
Your GE water softener features an inlet port where hard water enters the system from your main supply line. This connection point is typically marked “IN” and should be positioned on the right side when facing the unit. The treated, softened water exits through the outlet port, marked “OUT,” usually on the left side. Think of it as water traveling right to left through your softener.
The bypass valve is perhaps the most important feature during installation and maintenance. This three-position valve allows you to redirect water flow, sending it directly from the inlet to the outlet without passing through the softener’s resin tank. During initial setup, keep the bypass engaged until all connections are secure and tested. This prevents untreated water from flooding your system if issues arise. The bypass also proves invaluable during filter changes or system maintenance, letting you maintain water flow throughout your home without interruption.
Water flows through the system in a straightforward path: entering through the inlet, passing through the resin tank where mineral exchange occurs, and exiting through the outlet as softened water. Picture a simple U-shaped journey where hard water transforms into gentle, eco-friendly soft water that protects your appliances and reduces soap consumption. Ensure all connections use appropriate fittings and comply with local plumbing codes for a leak-free, efficient system.
Drain Line Setup and Requirements
The drain line is essential for your GE water softener’s regeneration cycle, safely removing excess minerals and brine from your system. Proper setup prevents water damage and ensures your softener operates efficiently for years to come.
Your drain line should be rigid 1/2-inch tubing or flexible drain hose, depending on your model’s specifications. Position the drain line to discharge into a floor drain, utility sink, or standpipe, keeping the run as short as possible while avoiding sharp bends that could restrict flow. The maximum recommended drain line length is typically 20 feet with an 8-foot maximum vertical lift, though checking your specific model’s manual is important.
Local plumbing codes often require an air gap between the drain line and the discharge point. This gap, usually 1.5 to 2 inches, prevents contaminated water from back-siphoning into your softener or home’s water supply. Some municipalities mandate a specific air gap device or backflow preventer, so contact your local building department before installation.
Secure the drain line properly to prevent movement during regeneration cycles, which can be surprisingly forceful. Use pipe straps or clips every few feet along the run. The discharge end should be positioned above the drain’s flood level to prevent backup.
From an eco-conscious perspective, proper drain line setup minimizes water waste by ensuring efficient regeneration cycles. Some homeowners even redirect brine discharge to appropriate outdoor areas where permitted, though always verify this complies with local environmental regulations protecting groundwater quality.
Step-by-Step GE Water Softener Installation Process
Shutting Down Your Water System Safely
Before installing your GE water softener, you’ll need to safely shut down your home’s water system to prevent leaks and water damage. Start by locating your main water supply valve, typically found near your water meter, in the basement, or where the main line enters your home. Turn the valve clockwise until it’s completely closed.
Next, open several faucets throughout your house, starting with those on upper floors and working downward. This simple step releases pressure and drains water from your pipes, making installation cleaner and easier. Don’t forget to flush toilets and run outdoor spigots to remove as much water as possible from the system.
Clear the installation area of any stored items and lay down towels or a waterproof tarp to catch residual water. Keep a bucket handy when disconnecting pipes, as some water will remain even after draining. This preparation protects your floors and creates a comfortable workspace.
Consider this an opportunity to inspect your existing plumbing for any signs of corrosion or wear. Addressing these issues now, before adding your water-saving softener system, ensures optimal performance and prevents future complications. Taking these careful preparatory steps makes the actual installation process smoother and helps protect both your home and your investment in cleaner, more sustainable water.
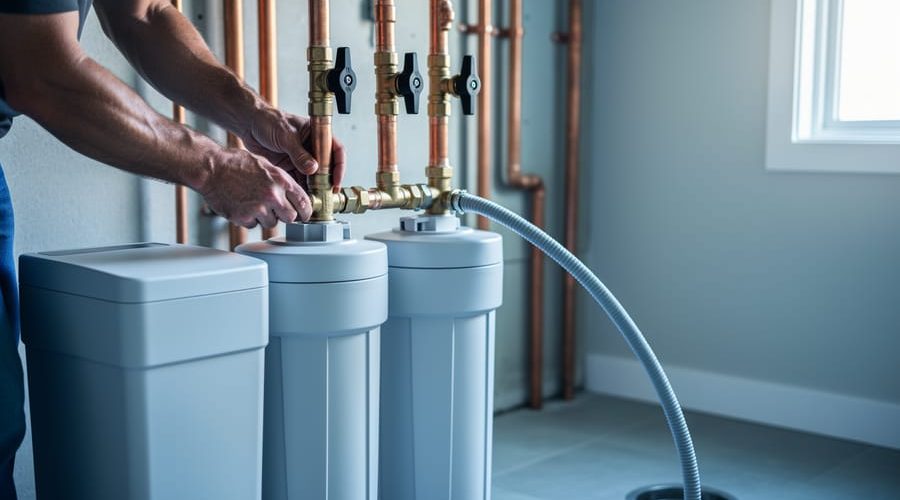
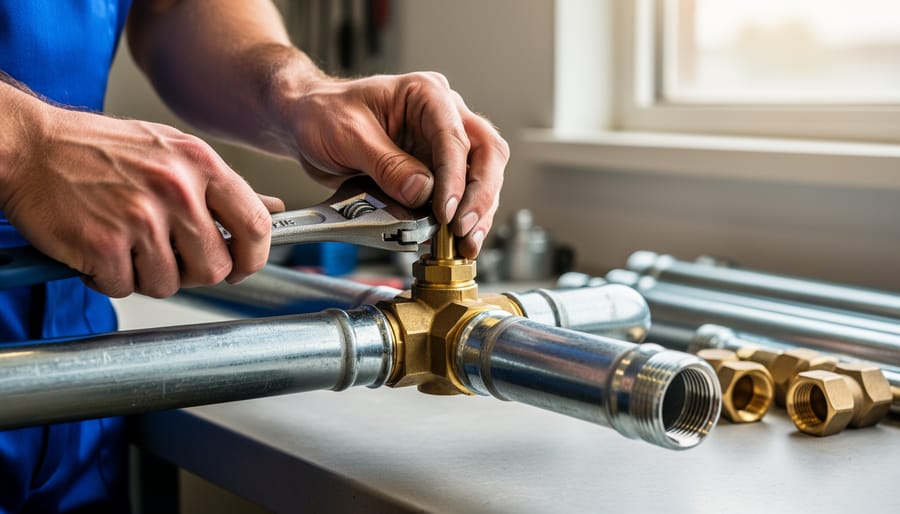
Installing the Bypass Valve and Connections
Proper installation of your GE water softener’s bypass valve and plumbing connections ensures efficient operation and prevents leaks. This step is crucial for controlling water flow during maintenance and emergencies, making your system both functional and eco-friendly by preventing water waste.
Begin by identifying your water supply’s main shut-off valve and turning it completely off. Open nearby faucets to release any remaining pressure in the lines. Position your GE water softener near your main water line, ensuring you have adequate space for servicing and salt refills. The unit should sit on a level surface, preferably on a platform or stand that protects it from potential floor moisture.
The bypass valve comes pre-assembled with most GE models and features three clearly marked ports: inlet, outlet, and bypass. This component allows you to redirect water around the softener when needed, which is particularly useful for maintenance or if you prefer unsoftened water for outdoor use, reducing your environmental footprint.
Connect the inlet side first. Your incoming hard water supply line attaches to the inlet port marked “IN” on the bypass valve. Use compression fittings or push-to-connect fittings designed for your pipe type, whether copper, PEX, or CPVC. These modern fittings eliminate the need for soldering, making installation more accessible for DIY homeowners. Ensure connections are hand-tight, then use a wrench for an additional quarter turn to prevent leaks without overtightening.
Next, attach the outlet pipe to the port marked “OUT,” which delivers softened water throughout your home. Maintain consistent pipe sizing throughout your connections to optimize water pressure and flow efficiency.
Finally, connect the drain line from the softener’s control valve to a nearby drain, laundry sink, or standpipe. This line carries away brine and mineral deposits during regeneration cycles. Position the drain line to prevent backflow, keeping the end at least two inches above the drain opening.
Setting Up Drain and Overflow Lines
Properly installing your drain and overflow lines is essential for preventing water damage and ensuring your GE water softener operates efficiently. Start by locating your drain tubing, typically a flexible plastic hose included with your system. This line carries away brine solution and backwash water during the regeneration cycle.
Position the drain tubing so it runs downward with a consistent slope toward your drainage point. A gradual decline helps gravity move wastewater smoothly without creating backflow issues. Common drainage destinations include a floor drain, utility sink, or standpipe. Keep the drain line within 20 feet of the softener when possible to maintain proper flow.
Secure the tubing using plastic clips or cable ties at regular intervals along walls or baseboards. This prevents sagging or kinking that could obstruct water flow. When connecting to your drainage point, ensure the end of the tubing sits above the drain opening but doesn’t touch standing water. This air gap prevents contaminated water from siphoning back into your system, protecting your household water supply.
Check all connections for tightness and run a manual regeneration cycle to test for leaks. This eco-friendly approach to proper drainage setup minimizes water waste while protecting your home from potential flooding during routine softening operations.
Electrical Connection and Safety
Before connecting your GE water softener to power, safety should be your top priority. Most GE softeners operate on standard 120-volt household electricity, but proper electrical setup protects both your investment and your home.
Always plug your water softener into a grounded, three-prong outlet. This grounding provides essential protection against electrical faults. More importantly, use a Ground Fault Circuit Interrupter (GFCI) outlet, which automatically cuts power if it detects any electrical irregularities. Since water softeners work in potentially damp environments, GFCI protection is crucial for preventing electrical shocks and potential hazards.
Check that your outlet is dedicated to the softener and not shared with high-draw appliances like washing machines or sump pumps. Overloaded circuits can trip breakers or damage your unit’s control valve. The power cord should rest safely away from water lines and have enough slack to prevent strain on the connection.
Never use extension cords or multi-plug adapters with your water softener. These create unnecessary fire risks and may void your warranty. If your installation location lacks a nearby outlet, hire a licensed electrician to install one properly. This small investment ensures reliable operation and maintains your unit’s safety certifications, giving you peace of mind while your softener works efficiently to improve your household water quality.
Programming Your GE Water Softener for Optimal Performance

Entering Your Water Hardness Level
Getting your water hardness level right is essential for your GE water softener to work efficiently and conserve salt. Without accurate settings, your system may regenerate too often, wasting resources, or not frequently enough, leaving your water hard.
Start by testing your water hardness using a test kit available at most hardware stores or through your local water utility’s annual report. The test measures minerals like calcium and magnesium in grains per gallon (gpg). Most households fall between 3 and 20 gpg, with anything above 7 gpg requiring softening.
Once you have your hardness number, locate the control panel on your GE softener. Press the menu button and navigate to the hardness setting option. Use the up and down arrows to input your test result. For example, if your water tests at 12 gpg, enter exactly that number.
This eco-smart approach ensures your system uses only the salt and water necessary for effective treatment, reducing environmental impact while protecting your plumbing and appliances. Remember to retest annually, as water hardness can fluctuate seasonally. Accurate hardness programming maximizes your softener’s efficiency while minimizing waste, aligning perfectly with sustainable household management.
Setting Regeneration Cycles
Setting your GE water softener to regenerate at optimal times helps conserve water and energy while maintaining soft water throughout your home. Most GE models offer three regeneration timing options: time-initiated, demand-initiated, or manual. Time-initiated systems regenerate on a fixed schedule, typically every few days, while demand-initiated models monitor actual water usage and regenerate only when necessary—the more eco-friendly choice that prevents unnecessary water waste.
For maximum efficiency, program regeneration during low-usage hours, usually between 2 AM and 4 AM when household water demand is minimal. This timing ensures the system completes its cycle without interrupting your daily activities like showering or laundry. During regeneration, the softener temporarily provides unsoftened water, so overnight scheduling is ideal.
Adjusting regeneration frequency depends on proper sizing for your household needs and water hardness levels. Larger families with higher water consumption require more frequent regeneration cycles. Most GE systems allow you to input your water hardness level and household size, automatically calculating the optimal schedule. Monitor your system during the first month and fine-tune settings if you notice hard water symptoms returning before the next regeneration. This personalized approach maximizes salt efficiency while ensuring consistent water quality.
Testing and Troubleshooting Your New System
Initial System Check and Leak Testing
Once your GE water softener is connected, it’s time for the critical testing phase. Start by slowly opening the main water supply valve—do this gradually over 30 seconds to prevent sudden pressure surges that could stress fittings or reveal hidden leaks. As water flows through, carefully inspect every connection point you’ve made, including inlet and outlet pipes, drain lines, and bypass valves. Look for even small drips or moisture, which indicate connections need tightening.
Next, check that water flows properly through the system by opening a nearby faucet. You should see steady pressure without sputtering or discoloration. If everything looks good, it’s time to initiate your first manual regeneration cycle. This process flushes out any manufacturing residues and prepares the resin bed for effective softening. Consult your owner’s manual for the specific button sequence—typically holding down the regeneration button for several seconds.
During this initial cycle, which takes about two hours, monitor the drain line to ensure proper water discharge. Listen for unusual sounds that might indicate mechanical issues. This first regeneration is essential for optimal performance and extends your system’s lifespan while maximizing water and salt efficiency—a win for both your household and the environment.
Common Setup Issues and Quick Fixes
Even after following installation steps carefully, you might encounter a few hiccups with your GE water softener. Low water pressure is a common concern, often caused by incorrectly adjusted bypass valves or kinked inlet/outlet lines. Simply check that all valves are fully open and tubing runs smoothly without sharp bends.
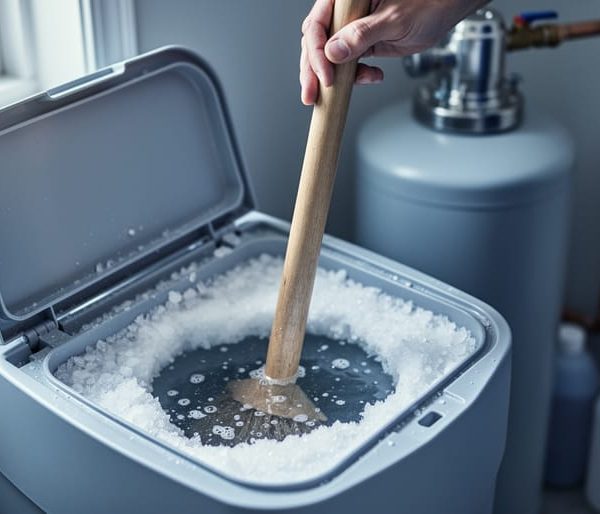
Salt bridge formation occurs when humidity creates a hard crust in your brine tank, preventing salt from dissolving properly. Gently break up the bridge with a broom handle and ensure your tank has adequate ventilation to prevent future buildup.
Programming errors typically happen during initial setup. If your softener isn’t regenerating correctly, double-check that you’ve entered accurate water hardness levels and household size into the control panel. Refer to your manual’s programming section and reset to factory settings if needed.
Iron buildup can clog resin beads over time, reducing efficiency. Use an iron-removing cleanser specifically designed for water softeners quarterly to maintain optimal performance. For comprehensive guidance on troubleshooting common water softener problems, remember that regular maintenance prevents most issues before they start.
Maintaining Your GE Water Softener for Long-Term Efficiency
Salt Management and Eco-Friendly Practices
Proper salt management keeps your GE water softener running efficiently while minimizing environmental impact. Check your brine tank monthly and refill when salt levels drop to about one-quarter full. Most households need to add salt every 6-8 weeks, though usage varies based on water hardness and consumption.
When choosing quality water softener salt, opt for high-purity options that dissolve cleanly and leave minimal residue. Solar salt and evaporated salt pellets are eco-friendly choices that reduce tank buildup and extend system life. Avoid rock salt, which contains more impurities and can decrease efficiency.
Prevent waste by programming your softener to regenerate only when necessary. Review your settings every few months and adjust based on actual water usage rather than manufacturer defaults. This reduces salt consumption and wastewater discharge. Keep the brine tank clean by removing any salt bridges or mushing, which occur when salt clumps together and prevents proper dissolution. Regular maintenance ensures your system uses resources efficiently while providing consistently soft water for your home.
Regular Inspection Schedule
Maintaining your GE water softener ensures optimal performance and extends its lifespan while keeping your household water quality consistently high. A simple monthly inspection involves checking the salt level in your brine tank, ensuring it stays at least one-quarter full. Look for salt bridging, where a hard crust forms above the water, preventing proper regeneration. Gently tap the salt with a broom handle to break any bridges. Also watch for salt mushing, a sludge-like layer at the tank bottom that reduces efficiency.
Every three months, inspect the system for leaks around connections and verify the bypass valve operates smoothly. Clean the brine tank annually by emptying remaining salt, removing sediment buildup with warm water, and wiping interior surfaces. This eco-friendly practice prevents clogs and maintains regeneration efficiency, reducing water and salt waste.
Monitor your water softener’s performance by noting soap lather quality and checking for scale buildup on fixtures. If you notice changes, test your water hardness or consult your system’s regeneration frequency settings. These proactive steps protect your investment while supporting sustainable water use in your home.
Setting up your GE water softener may seem challenging at first, but with the right guidance, it’s an achievable DIY project that puts you in control of your home’s water quality. By following proper installation procedures, you’ve taken an important step toward protecting your plumbing, extending appliance lifespan, and reducing your environmental footprint through more efficient water and energy use. Remember that a correctly installed water softener means less soap waste, fewer harsh chemicals needed for cleaning, and lower energy costs for heating water—benefits that align perfectly with sustainable living principles.
As you enjoy the immediate improvements of softer water, from smoother skin to cleaner dishes, you’re also making a long-term investment in your home’s infrastructure and the planet. Regular maintenance and proper setup ensure your system operates at peak efficiency for years to come. Ready to explore more ways to enhance your home’s water quality? Discover our latest articles on cutting-edge water treatment technologies, eco-friendly filtration systems, and innovative solutions that can transform your household water into its cleanest, most sustainable form yet. Your journey toward better water quality starts today.