Rainwater harvesting transforms every rainfall into an opportunity to capture free, natural water for your home while reducing strain on municipal systems and lowering utility bills. The process works through a surprisingly straightforward system: gutters channel rain from your roof into storage tanks, where the water waits for household use in gardens, toilets, washing machines, or even as drinking water after proper treatment.
Understanding the mechanics empowers you to make informed decisions about implementing this sustainable practice. At its core, a rainwater harvesting system consists of five essential components working together: collection surfaces (typically your roof), conveyance systems (gutters and downspouts), filtration mechanisms that remove debris and contaminants, storage tanks ranging from simple barrels to underground cisterns holding thousands of gallons, and distribution systems that deliver water where you need it.
The beauty of rainwater harvesting lies in its scalability and adaptability. A basic setup can start with a single rain barrel collecting runoff from one downspout, costing less than $100 and providing water for garden beds within days of installation. More comprehensive systems integrate whole-house filtration, automated pumps, and first-flush diverters that discard initial contaminated runoff before clean water enters storage.
This article walks you through each component’s function, the water’s journey from sky to tap, treatment options for different uses, and practical considerations for designing a system matched to your climate, roof size, and water needs.
What Is Rainwater Harvesting?
Rainwater harvesting is the practice of collecting and storing rain that falls on your roof or other surfaces, rather than letting it simply run off into storm drains. Think of it as capturing nature’s free water delivery service for your own use. Instead of relying solely on municipal water supplies or wells, you intercept rainfall before it disappears, channeling it into storage tanks where it’s available for various household purposes like watering gardens, washing cars, flushing toilets, or even drinking water when properly treated.
This simple yet powerful concept involves three basic components: a catchment area (typically your roof), a conveyance system (gutters and downspouts), and storage containers (tanks or cisterns). When rain falls, it flows across your roof, travels through gutters, passes through filters to remove leaves and debris, and settles into your storage system until you’re ready to use it.
While rainwater harvesting might sound like a modern eco-innovation, it’s actually one of humanity’s oldest water management strategies. Ancient civilizations from Rome to India built elaborate systems to capture monsoon rains, and many traditional communities worldwide never stopped using these methods. What’s changed is the technology. Today’s systems combine time-tested principles with cutting-edge filtration, smart monitoring, and efficient storage solutions that make implementation easier and more effective than ever.
Understanding the rainwater harvesting basics opens the door to reducing your water bills, decreasing dependence on treated municipal water for non-potable uses, and contributing to environmental sustainability. It’s a practical step toward self-sufficiency that works whether you live in a rainy climate or an area with seasonal downpours.

The Four Essential Components of a Rainwater Harvesting System
Catchment Surface (Your Roof)
Your roof is the foundation of any rainwater harvesting system, acting as the primary collection surface. When rain falls, your roof channels water toward gutters and downspouts, making it the first step in capturing this valuable resource.
The material of your roof significantly impacts both collection efficiency and water quality. Metal roofs, including steel and aluminum, are considered ideal because they’re smooth, durable, and don’t absorb water. Clay and concrete tiles also work well, shedding water effectively. Asphalt shingles, while common, may release petroleum-based particles into collected water, though they’re still usable with proper filtration.
Avoid collecting water from roofs with toxic materials like lead-based paint, treated wood shingles, or asbestos. These can contaminate your water supply and pose health risks.
Several factors affect the quality of water coming off your roof. Overhanging trees drop leaves and organic debris, while bird droppings and airborne pollutants accumulate on roof surfaces. Regular maintenance, including cleaning gutters and trimming nearby branches, helps minimize contamination. The first flush of rain typically carries the most debris, which is why many systems include devices to divert this initial runoff before capturing cleaner water.
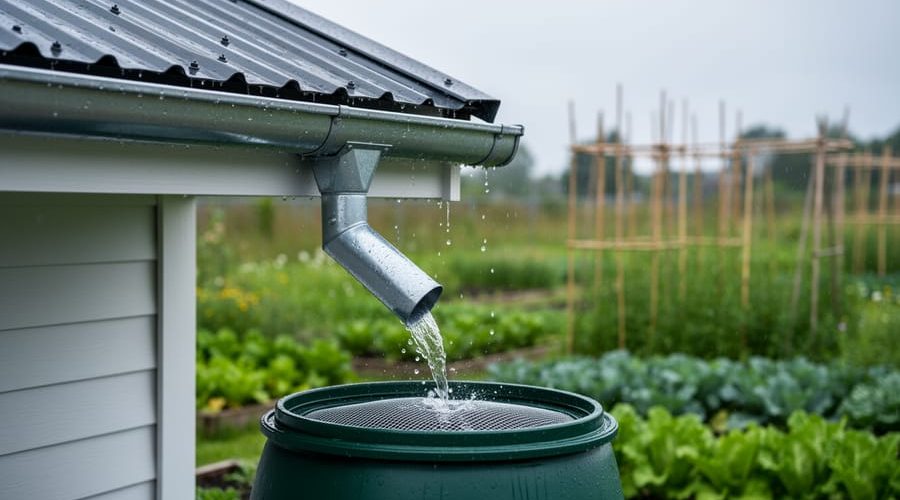
Gutters and Downspouts (The Delivery System)
Your roof’s gutter collection systems serve as the vital delivery network that channels rainwater from your roof into storage. Think of gutters and downspouts as the highways that transport this valuable resource to where you need it most.
Proper sizing is essential for effective water collection. Your gutters must be wide enough to handle the volume of water your roof produces during heavy rainfall. A general rule suggests five-inch gutters for most residential roofs, though larger roofs or areas with intense storms may require six-inch systems.
Regular maintenance keeps your system functioning optimally. Leaves, twigs, and debris can quickly clog gutters, reducing water flow and potentially causing overflow. Installing gutter guards or screens provides a simple solution, filtering out larger debris while allowing water to pass through freely.
Position downspouts strategically to direct water toward your storage tanks or rain barrels. Each downspout should include a first-flush diverter, which automatically diverts the initial, dirtiest water away from your storage system. This eco-friendly approach ensures cleaner water collection while maximizing your roof’s potential as a sustainable water source for household use.
Filtration and First Flush Diverters
Before rainwater enters your storage tank, it needs a good cleaning to protect your water quality and ensure it’s safe for household use. This is where filtration systems and first flush diverters become essential components of any rainwater harvesting setup.
Think of pre-storage filtration as your first line of defense against contaminants. As rainwater flows from your roof, it picks up leaves, dust, bird droppings, pollen, and other debris. Basic mesh screens or gutter guards catch larger materials, while finer filters remove smaller particles before the water reaches your tank. These filters are typically installed in your downspouts or at the tank inlet, creating multiple barriers against contamination.
First flush diverters add another layer of protection by automatically discarding the initial runoff from each rainfall event. When rain first hits your roof, it washes away accumulated pollutants that have settled since the last storm. A first flush diverter captures this dirtiest water—usually the first few gallons—and diverts it away from your storage system. Once the diverter chamber fills, cleaner water flows into your tank.
Together, these systems significantly reduce sediment buildup, minimize bacterial growth, and extend the life of your storage tank and plumbing fixtures, making your harvested rainwater cleaner and more suitable for various household applications.
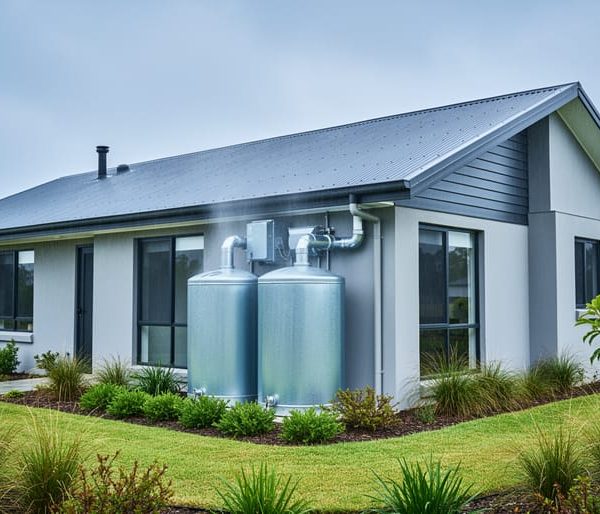
Storage Tanks
Once your gutters collect the rainwater, it needs somewhere to go. Storage tanks are the heart of any rainwater harvesting system, holding your captured water until you’re ready to use it.
The simplest option is a rain barrel, typically holding 50-80 gallons. These plastic or wooden containers work well for small-scale needs like watering gardens or washing outdoor equipment. For homeowners wanting more capacity, cisterns offer serious storage ranging from 500 to several thousand gallons. You’ll find these made from various materials including polyethylene plastic, fiberglass, concrete, or galvanized steel. Each material has its advantages—plastic cisterns are lightweight and affordable, while concrete options provide excellent durability and natural cooling properties.
Sizing your storage depends on three factors: your roof’s collection area, local rainfall patterns, and how much water you’ll actually use. A good rule of thumb is calculating that every inch of rain falling on 1,000 square feet of roof yields about 600 gallons. Most households benefit from tanks that can store at least two weeks’ worth of their intended water usage.
Your storage tank connects to the system through inlet pipes from your gutters and outlet pipes leading to your distribution system. Proper tank placement matters too—elevating storage creates natural water pressure through gravity, reducing the need for electric pumps and keeping your system eco-friendly and cost-effective.
The Step-by-Step Journey of Rainwater Through Your System
Let’s follow a raindrop on its journey through a typical rainwater harvesting system, from the sky to your home.
When rain begins to fall, droplets land on your rooftop, the primary collection surface in most residential systems. As gravity takes over, water flows down the slope of your roof toward the gutters. This initial stage is crucial because your roof acts as the first filter, which is why maintaining a clean roof surface matters for water quality.
The gutters channel water along the edge of your roof, gathering flow from across the entire collection area. From there, water moves into downspouts, which direct it downward toward ground level. At this point, many systems incorporate a leaf screen or gutter guard to catch larger debris like leaves, twigs, and seed pods before they enter the storage system.
As water exits the downspout, it encounters the first diverter, a simple but important component. This device diverts the initial flow of water away from your storage tank. Why? Because the first rainfall washes accumulated dust, pollen, and bird droppings from your roof. By diverting this “first flush” of dirtier water, you prevent contaminants from entering your storage tank.
Once the first flush passes, cleaner water flows through a conveyance pipe into your storage tank or cistern. Many systems include a basic screen filter at the tank inlet to catch any remaining debris. Inside the storage tank, water sits quietly, ready for use. The tank itself is designed to keep water cool and dark, preventing algae growth and maintaining quality during storage.
When you need water, a pump draws it from the tank through an outlet pipe positioned slightly above the tank bottom. This positioning is strategic, as any sediment that settles remains undisturbed at the tank floor. The water then passes through additional filtration systems, which might include sediment filters, carbon filters, or even UV sterilization units, depending on your intended use.
For basic applications like garden irrigation or toilet flushing, minimal treatment suffices. However, if you’re considering potable use in areas where regulations permit, more sophisticated filtration and purification become necessary to ensure safety.
Finally, the treated water reaches its destination through your home’s secondary plumbing system or outdoor spigots. Throughout this entire journey, which takes only minutes from sky to tap, gravity and simple mechanical processes do most of the work, making rainwater harvesting an elegant, low-energy solution for sustainable water management.

How Harvested Rainwater Gets Treated for Household Use
Once collected, rainwater requires treatment before it’s ready for household use. The level of treatment needed depends entirely on how you plan to use the water. Understanding these filtration stages helps you make informed decisions about your rainwater harvesting system.
For non-potable applications like toilet flushing, laundry, and garden irrigation, basic treatment is usually sufficient. This typically starts with screening to remove leaves and debris, followed by first-flush diversion that discards the initial rainwater containing roof contaminants. A simple mesh filter then catches any remaining particles before the water enters your storage tank.
When you want to use harvested rainwater for drinking and cooking, more advanced treatment becomes essential. The process typically involves multiple stages to ensure safety. After basic screening and first-flush diversion, the water passes through sediment filters that remove fine particles and dirt. Next, activated carbon filters eliminate organic compounds, chemicals, and any unpleasant tastes or odors that might be present.
Many homeowners add ultraviolet purification as a crucial final step. UV light effectively neutralizes bacteria, viruses, and other microorganisms without adding chemicals to your water. Some systems also incorporate reverse osmosis for maximum purification, though this isn’t always necessary for rainwater that’s been properly pre-filtered.
Regular maintenance keeps your treatment system working effectively. This means cleaning gutters and roof surfaces, replacing filters according to manufacturer recommendations, and periodically testing your water quality. Most basic filters need changing every three to six months, while UV bulbs typically require annual replacement.
The good news is that rainwater harvesting systems can be scaled to match your needs and budget. You might start with basic filtration for outdoor use and gradually upgrade to potable-quality treatment as you become more comfortable with the technology. The key is choosing appropriate treatment methods that align with your intended water uses while maintaining safety standards for your household.
What You Can Actually Use Rainwater For
Rainwater harvesting opens up numerous possibilities for reducing your reliance on municipal water, though understanding which applications require treatment versus those that don’t helps set realistic expectations.
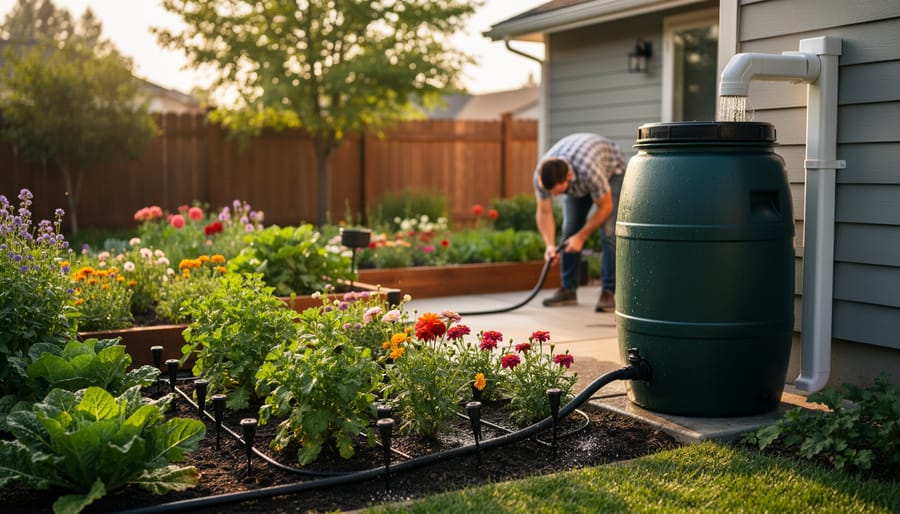
The simplest and most common use for harvested rainwater requires zero treatment: outdoor irrigation. Whether you’re watering your vegetable garden, flower beds, lawn, or potted plants, untreated rainwater works beautifully and often better than tap water since it lacks chlorine and other treatment chemicals. Your plants will appreciate the natural mineral content, and you’ll appreciate the savings on your water bill.
You can also use untreated rainwater for washing vehicles, outdoor furniture, and driveways. It’s perfectly suitable for filling ornamental ponds or water features, and many homeowners use it for composting operations where moisture is essential.
For toilet flushing and laundry applications, rainwater becomes an excellent option once you’ve installed basic filtration to remove debris and sediment. These uses don’t require drinking-quality water but benefit from simple screening and settling processes. This approach works similarly to greywater recycling, which reuses water from sinks and showers for non-potable purposes.
However, using rainwater for drinking, cooking, or bathing requires more sophisticated treatment including filtration, UV sterilization, or chemical disinfection. While technically achievable, most residential systems focus on non-potable applications due to the complexity and cost of achieving potable standards. Local regulations often dictate what’s permissible, so checking with your municipality before planning indoor uses is essential.
The realistic sweet spot for most homeowners combines outdoor irrigation with indoor toilet flushing, potentially reducing household water consumption by 40-50 percent while keeping system complexity manageable and costs reasonable.
How Much Water Can You Really Collect?
Understanding your rainwater collection potential doesn’t require complicated calculations. Here’s a straightforward approach that any homeowner can use.
The basic formula is remarkably simple: for every inch of rainfall, you can collect approximately 0.6 gallons of water per square foot of roof area. This accounts for natural losses from evaporation, splashing, and initial roof washing.
Let’s look at a practical example. If your home has a 1,500 square foot roof and your area receives 30 inches of annual rainfall, you could potentially harvest around 27,000 gallons per year. That’s enough to irrigate a substantial garden, wash multiple cars, or significantly reduce your municipal water usage.
For a quick estimation without complex math, measure your roof’s footprint by checking property records or using online mapping tools. Most show building dimensions clearly. Next, find your area’s average annual rainfall through local weather services or a simple internet search.
Here’s an even easier approach: a 1,000 square foot roof in an area with 25 inches of annual rainfall will yield approximately 15,000 gallons. Scale up or down from there based on your specific situation.
Remember that collection efficiency varies with roof material. Metal roofs typically yield the highest collection rates, while textured shingles may reduce efficiency slightly. Your first-flush diverter will also redirect the initial rainfall to remove debris, so factor in about 10 percent less than your calculated maximum. These real-world adjustments help set realistic expectations for your rainwater harvesting system’s performance.
Environmental and Financial Benefits That Matter to Your Household
Installing a rainwater harvesting system delivers tangible benefits that directly impact your household budget and local environment. Understanding these advantages helps you make an informed decision about whether this sustainable practice fits your home.
The most immediate benefit appears on your monthly utility bill. By using collected rainwater for outdoor irrigation, toilet flushing, and laundry, most homeowners reduce their municipal water consumption by 30-50%. Depending on your local water rates and usage patterns, this translates to savings of $200-600 annually. Homes in drought-prone regions or areas with tiered water pricing see even greater reductions, making the system pay for itself within 5-10 years.
Beyond personal savings, rainwater harvesting eases pressure on municipal water supplies. When thousands of households reduce their demand, cities can delay expensive infrastructure expansions and better manage water resources during drought conditions. You’re essentially creating your own backup water supply while helping your community maintain adequate reserves.
The environmental impact extends to stormwater management, which many homeowners overlook. Traditional properties channel rainwater directly into storm drains, picking up pollutants from roofs and driveways along the way. This contaminated runoff flows into local streams and rivers, degrading water quality. Your harvesting system intercepts this water before it becomes runoff, reducing erosion, flooding risks, and pollution in nearby waterways.
These financial and environmental benefits compound over time. You’re conserving treated drinking water for essential uses, protecting local ecosystems, and building resilience against water scarcity—all while maintaining a healthy landscape and reducing monthly expenses. For environmentally-conscious homeowners, rainwater harvesting represents a practical step toward sustainable living that delivers measurable results.
Getting Started: What Homeowners Need to Know
Ready to explore rainwater harvesting for your home? Here’s what you need to know before taking the plunge.
Start by checking local regulations and building codes. Many municipalities encourage rainwater harvesting through incentives or rebates, while others have specific requirements about tank placement, overflow management, and water usage. Contact your local water authority or building department to understand what’s permitted in your area. Some regions restrict harvested rainwater to outdoor use only, while others allow it for laundry and toilet flushing with proper treatment.
Next, assess your property’s suitability. Calculate your roof’s catchment area by multiplying its footprint dimensions. A typical 1,000-square-foot roof can collect approximately 600 gallons from just one inch of rainfall. Consider your average annual rainfall, water needs, and available space for storage tanks. Homes with metal or tile roofs make excellent candidates, while asphalt shingles work but may require additional filtration.
Deciding between DIY and professional installation depends on system complexity. Simple rain barrel setups collecting 50-200 gallons cost between 100 and 500 dollars and make great starter projects for handy homeowners. However, a large rainwater harvesting system with underground tanks, pumps, and filtration typically requires professional installation.
Budget expectations vary widely. Basic barrel systems start around 100 dollars, while comprehensive whole-house systems range from 5,000 to 15,000 dollars depending on storage capacity and treatment requirements. Factor in ongoing maintenance costs for filter replacements and annual system inspections. Many homeowners start small with outdoor irrigation systems, then expand as they gain confidence and see water bill savings accumulate.
Rainwater harvesting represents one of the most accessible entry points into sustainable living for homeowners today. Unlike many eco-friendly upgrades that require significant investment or technical expertise, even a basic rain barrel system can start delivering benefits immediately. You’ll reduce your municipal water consumption, lower utility bills, and gain a reliable backup water source during dry spells or restrictions—all while taking meaningful action toward environmental stewardship.
The beauty of rainwater harvesting lies in its scalability. Whether you start with a simple 50-gallon barrel for garden watering or eventually graduate to a sophisticated 5,000-gallon underground cistern with filtration for household use, you’re participating in an ancient practice reimagined with cutting-edge water innovations. Every gallon you collect reduces stormwater runoff, eases pressure on overtaxed municipal systems, and decreases the energy required to treat and pump water to your home.
Taking the first step doesn’t require perfect knowledge or a massive budget. Begin by assessing your roof area, calculating potential collection volumes, and identifying your primary water needs. Local regulations, available rebates, and professional installers in your area can guide you through the process. Remember, rainwater harvesting isn’t just about conservation—it’s about reclaiming control over a vital resource while building resilience into your home. The question isn’t whether rainwater harvesting works, but rather when you’ll start harnessing the free, sustainable resource falling on your roof.