Check your salt level first—low salt is the most common culprit behind hard water breakthrough, and your tank should be at least one-quarter full at all times. Inspect the brine tank for a salt bridge, a hardened crust that forms above the water line and prevents proper regeneration; break it up by gently pushing a broom handle down through the salt. Verify your system is regenerating on schedule by listening for the cycle at night or checking your control panel settings, as modern water softener systems often lose programming during power outages.
When you notice slippery, over-softened water, your hardness setting may be too high—test your water and adjust the grain capacity setting downward by 10-20% increments. Look for visible salt mushing, a sludgy mixture at the tank bottom that blocks water flow and prevents regeneration; scoop it out and flush the tank thoroughly with clean water. Examine the venturi valve and screen for mineral buildup or debris, as even small blockages here stop the brine draw cycle completely, leaving you with untreated hard water throughout your home.
Address low water pressure by checking the bypass valve position and ensuring it’s in the service mode, not bypass. Clean the resin bed if you’re experiencing iron staining or foul odors, using a specialized resin cleaner designed for water softeners to restore efficiency. Know when to call a professional—if your control valve is leaking, the motor won’t run despite troubleshooting, or you suspect internal seal failure, attempting DIY repairs may cause more damage than the service call costs.
Signs Your Water Softener Needs Attention
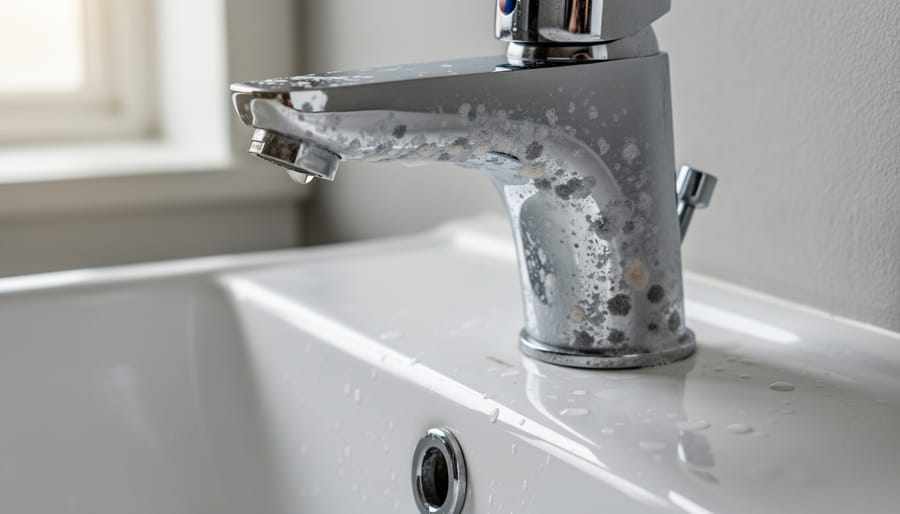
Hard Water Returning to Your Faucets
When your water softener stops working properly, hard water minerals begin flowing through your pipes untreated, and you’ll notice the telltale signs quickly. The most obvious indicators appear in your daily routines. If soap suddenly won’t lather well in the shower or leaves a filmy residue on your skin, that’s hard water at work. Your dishes and glassware may emerge from the dishwasher covered in white spots or a cloudy film, even after a complete wash cycle.
Check your bathroom fixtures for crusty white or yellowish buildup around faucets and showerheads. This mineral scale accumulates rapidly when softened water reverts to hard water. Your skin and hair might feel unusually dry or irritated, as hard water prevents soap from rinsing cleanly. Laundry may come out stiff or dingy, with whites appearing gray over time.
These symptoms indicate your softener isn’t regenerating properly or has run out of salt. Before calling a technician, verify your salt levels and check for salt bridges or mushing in the brine tank, which are common culprits that prevent proper water treatment.
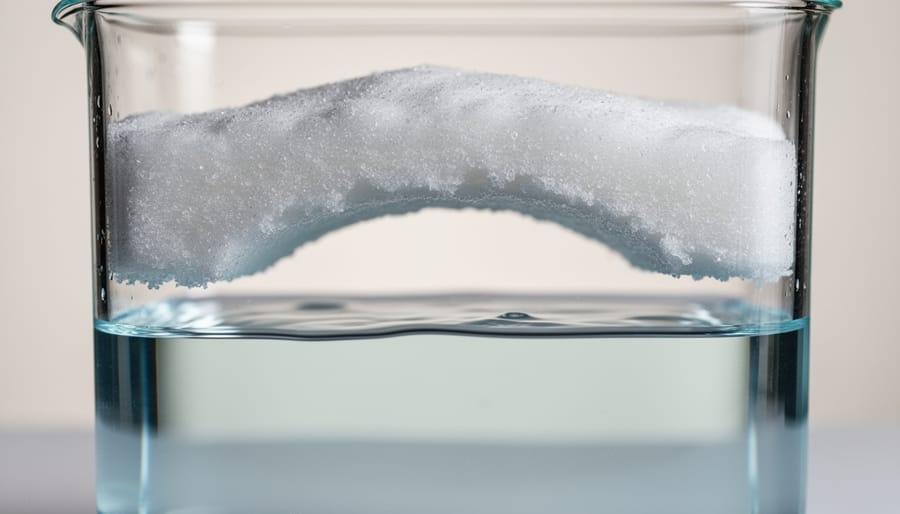
Salt Bridge and Mushing Problems
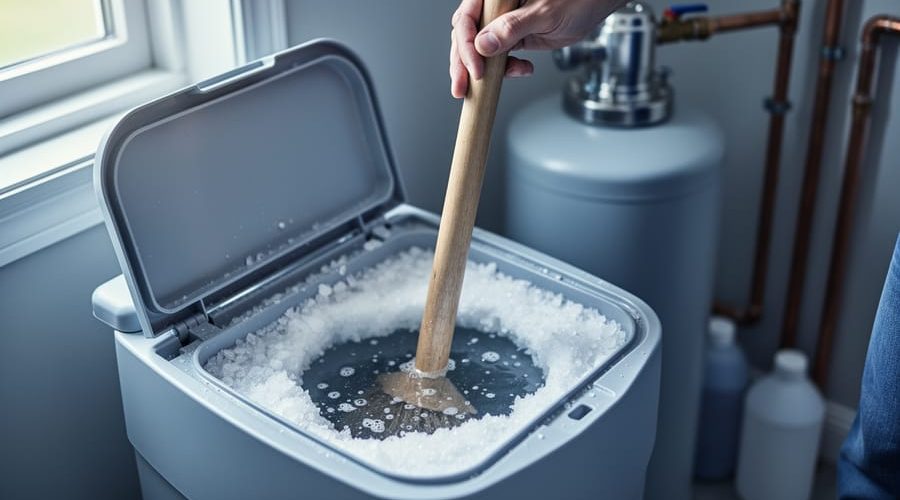
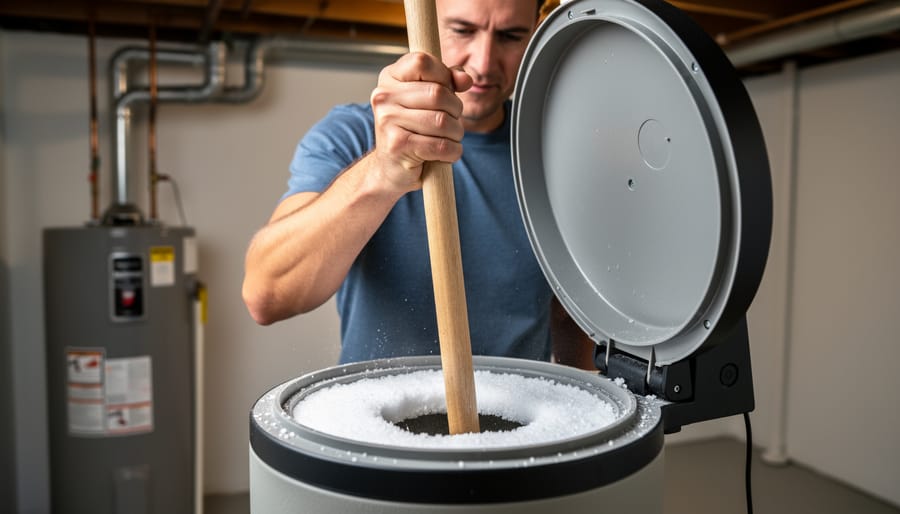
Two common salt tank issues can silently sabotage your water softener’s performance: salt bridges and mushing. A salt bridge forms when a hard crust develops above the water line in your brine tank, creating an empty cavity underneath. You might see plenty of salt on top, but your system is actually starving for it because the salt won’t dissolve properly into the water below. To check for a bridge, gently push a broom handle down through the salt—if it breaks through a crusty layer with empty space beneath, you’ve found your problem.
Salt mushing happens when dissolved salt recrystallizes at the tank’s bottom, forming a thick sludge that blocks water flow. This prevents the brine solution from reaching proper concentration during regeneration cycles, leaving you with hard water. Both issues stop your softener from regenerating effectively, wasting salt and leaving minerals in your water supply.
Unusual System Sounds or Constant Cycling
Your water softener should operate quietly in the background, cycling on schedule without drawing attention. If you’re noticing grinding, clicking, or humming sounds, something’s amiss. These unusual noises often indicate mechanical issues—worn gears, loose components, or a struggling motor that needs attention before it fails completely.
Constant running is another red flag. A properly functioning system regenerates periodically based on water usage or a timer, then stops. If yours runs continuously, you’re wasting water and salt while driving up utility costs—hardly an eco-friendly scenario. This typically points to a stuck valve, faulty timer, or control panel malfunction.
Conversely, if your softener never cycles at all, you’ll notice hard water symptoms returning—spotty dishes, soap scum buildup, and that telltale mineral taste. Check your timer settings first, then inspect for electrical issues or a frozen valve. These warning signs shouldn’t be ignored, as prolonged operation problems can cause permanent damage and reduce your system’s lifespan significantly.
Quick Checks Before You Start Troubleshooting
Power and Electrical Connections
Before diving into complex diagnostics, start with the basics—power issues are surprisingly common culprits when your water softener stops working. First, confirm your unit is securely plugged into its outlet. Over time, plugs can work loose from vibrations or accidental bumps during household activities.
Next, test the outlet itself by plugging in a lamp or phone charger to verify it’s delivering power. If the outlet is dead, head to your electrical panel and look for tripped circuit breakers. A tripped breaker will sit in a middle position between “on” and “off”—flip it fully off, then back on to reset. For homes with older fuse boxes, check if the fuse controlling your water softener has blown and replace it if necessary.
Sometimes, power surges during storms can interrupt service. If you’ve recently experienced severe weather, this should be your first checkpoint. Additionally, inspect the power cord for visible damage like fraying or bite marks from pets. A damaged cord poses safety risks and requires immediate replacement. These simple electrical checks take just minutes but resolve many water softener problems without professional intervention, saving you time and money.
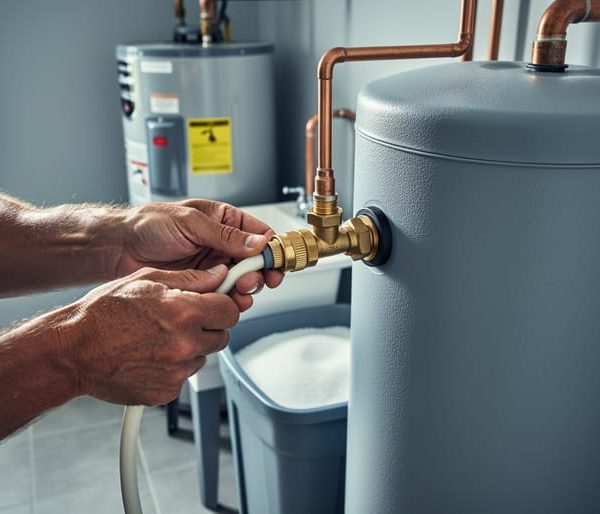
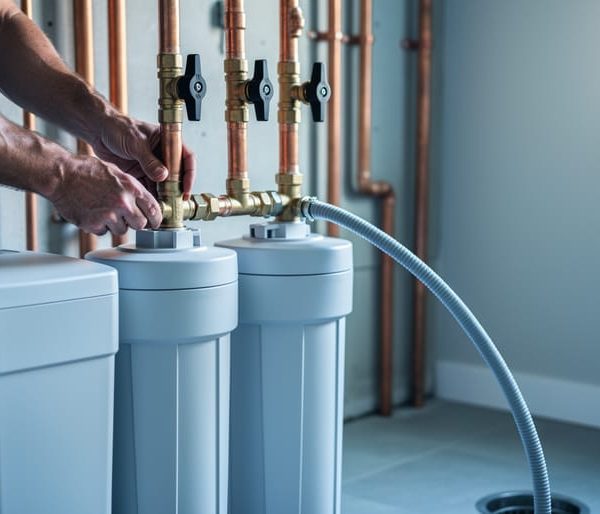
Water Supply and Bypass Valve Position
Before diving into complex diagnostics, start with this simple check that solves many water softener issues. Your system has three key valves that control water flow, and if any are incorrectly positioned, your softener won’t work properly.
First, locate your bypass valve, typically found at the back of your unit where pipes connect. This valve has three positions: service (normal operation), bypass (water skips the softener), and sometimes a third position for maintenance. Ensure it’s set to service position so water flows through your softening system. If accidentally switched to bypass, you’ll get hard water throughout your home even though the softener appears to run normally.
Next, check the inlet and outlet valves on either side of your system. Both should be fully open, with handles parallel to the pipes. Partially closed valves restrict water flow, reducing softening effectiveness and potentially triggering error codes.
This quick valve check takes just minutes but resolves a surprising number of problems. It’s an eco-friendly first step that prevents unnecessary service calls and keeps your system running efficiently, conserving both water and salt while protecting your home from hard water damage.
Salt Level and Quality
Your brine tank needs proper salt levels to regenerate the resin beads that soften your water. Start by checking if salt levels have dropped below the water line—you should maintain at least one-quarter tank full. Look for salt bridges, which are hardened crusts that form above the water, creating empty space underneath. Gently press down on the salt with a broom handle; if it doesn’t reach water or feels hollow, you’ve found a bridge that needs breaking up.
Inspect your salt quality too. Old salt can form into a thick, mushy layer called salt mushing at the tank bottom, preventing proper brine solution formation. This sludge prevents water from dissolving fresh salt above it. If you spot discoloration, clumping, or dirt, it’s time to clean out the tank completely and refill with fresh, high-purity softener salt.
Choose the right salt type for your system and local water conditions. While traditional salt works, considering eco-friendly alternatives or potassium chloride reduces environmental impact from sodium discharge into wastewater. Regular monthly checks prevent these issues from escalating into system failures, keeping your softener working efficiently and your household water quality optimal.
Common Water Softener Problems and Their Solutions
Breaking Up Salt Bridges and Clearing Salt Mushing
Salt bridges and mushy salt are two common culprits that prevent your water softener from working properly. A salt bridge is a hardened crust that forms above the water line, creating an empty space below while your system thinks it has plenty of salt. Salt mushing occurs when dissolved salt recrystallizes at the tank bottom, forming a sludge that blocks water flow.
To break up a salt bridge, first turn off your water softener. Gently push a broom handle down into the salt. If it drops suddenly after pushing through a hard layer, you’ve found your bridge. Carefully break it into chunks by tapping downward, but avoid damaging the tank walls. Once broken, remove the large pieces and let the remaining salt fall into the water below.
For mushy salt, you’ll need to scoop out the sludge manually using a plastic cup or container. Drain the brine tank first if possible, then remove the wet, paste-like salt from the bottom. This material won’t dissolve properly, so complete removal is essential for restoring function.
After clearing either problem, add fresh salt and run a manual regeneration cycle. To prevent future issues, use high-quality salt pellets, avoid overfilling your tank, and maintain proper humidity levels in your water softener’s location.
Fixing Resin Tank Issues and Low Water Pressure
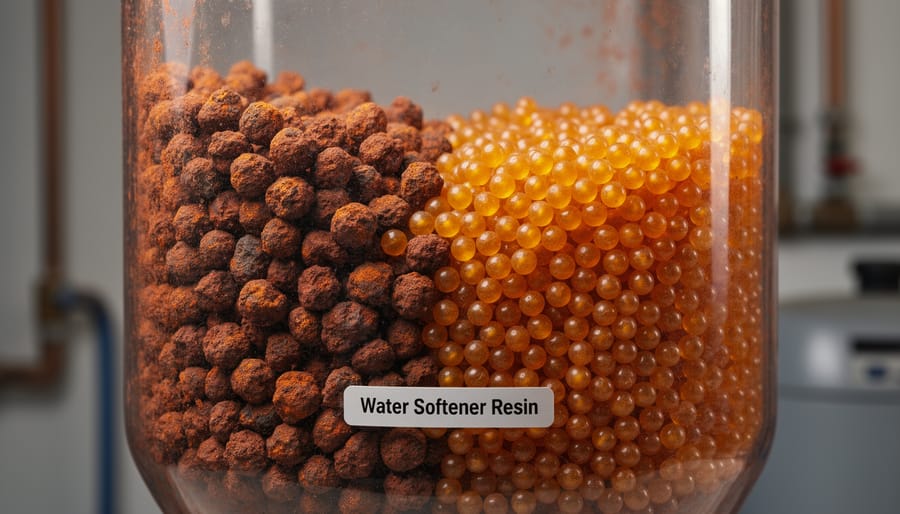
The resin tank is your water softener’s powerhouse, where hard minerals get captured and replaced with softened water. When it’s not working properly, you’ll notice reduced water pressure and hard water symptoms returning. Here’s how to tackle these common resin-related issues.
First, check for a clogged resin bed. Over time, iron, sediment, and mineral buildup can compact the resin beads, restricting water flow. Try running a manual regeneration cycle—this flushes the system and often clears minor blockages. If your water has high iron content, consider using an iron-out product specifically designed for water softeners during regeneration. This eco-friendly approach can extend your resin’s lifespan while maintaining optimal performance.
Resin beads typically last 10-15 years, but several factors can shorten their life. Chlorine exposure, iron contamination, and poor maintenance accelerate deterioration. Signs you need replacement include persistent hard water despite proper salt levels, visible resin beads in your water, or a musty smell from the tank. While resin replacement is possible as a DIY project, it requires careful handling to avoid damaging the tank’s internal components.
If low water pressure persists after cleaning and regeneration, inspect the distributor tube inside the tank—cracks here can disrupt the entire softening process and warrant professional attention.
Resolving Timer and Control Valve Malfunctions
When your water softener fails to regenerate properly, the timer or control valve is often the culprit. These components act as your system’s brain and heart, coordinating when and how regeneration occurs.
Start by checking your electronic timer’s display. If it’s blank or flashing erratically, you may have a power issue or need battery replacement. Most digital timers have backup batteries that keep settings during outages—swap these annually to prevent memory loss. Verify your regeneration schedule matches your household’s water usage; a family of four typically needs regeneration every three to four days.
For mechanical timers with clock dials, ensure the current time matches the dial position. If your system isn’t regenerating at the scheduled time, gently turn the dial through a full cycle while listening for motor engagement. A silent motor suggests electrical failure, while grinding noises indicate worn gears needing replacement.
Control valve positioning problems often stem from manual bypass valve misalignment. Check that handles point in the correct direction—usually parallel to pipes for normal operation. If your valve seems stuck between positions, mineral buildup may be preventing movement. Manually advancing the regeneration cycle can help determine if the valve responds to commands. When valves won’t budge despite proper timer signals, internal seals or pistons may require professional servicing to restore proper water flow and treatment efficiency.
Addressing Clogged Injectors and Venturi Problems
The injector or venturi assembly is a small but crucial component that creates suction to draw brine from the salt tank into the resin tank during regeneration. When this becomes clogged with sediment, iron, or mineral deposits, your softener can’t complete its cleaning cycle effectively, leading to hard water throughout your home.
To address this issue, first locate the injector assembly, typically found in the control valve housing. Before starting, unplug your softener and relieve any water pressure. Remove the cap or cover protecting the injector and carefully extract the small screen and nozzle components. You’ll likely notice brown or white buildup restricting water flow.
Clean these parts by soaking them in white vinegar for 15-30 minutes to dissolve mineral deposits. For stubborn clogs, use a soft toothbrush or special injector cleaning tool. Rinse thoroughly with clean water and inspect the tiny opening in the venturi nozzle, ensuring it’s completely clear by holding it up to light.
If cleaning doesn’t restore proper function or if components appear damaged or worn, replacement parts are inexpensive and readily available from your softener’s manufacturer. This simple maintenance task, performed annually, prevents bigger problems and keeps your system running efficiently while reducing unnecessary water waste during regeneration cycles.
Fixing Water in the Brine Tank Between Cycles
If you notice standing water in your brine tank between regeneration cycles, your system isn’t draining properly. Normally, the tank should be nearly empty after regeneration, containing just a few inches of water at the bottom with visible salt pellets above.
Start by checking the brine line for clogs. This small tube connects your brine tank to the main control valve and can become blocked with salt buildup or sediment. Disconnect it carefully and flush with warm water to clear any obstructions.
Next, inspect the float valve inside the brine tank. This mechanism controls water levels and can stick in the closed position due to salt bridges or debris. Gently lift and lower the float assembly to ensure it moves freely. If it’s stuck, clean it thoroughly with warm water and vinegar to dissolve mineral deposits.
The drain line flow control could also be restricted. Locate the small plastic fitting where the drain line connects and check for blockages. Even small obstructions can prevent proper drainage.
For eco-conscious homeowners, maintaining proper drainage prevents water waste and ensures your system uses salt efficiently. If these steps don’t resolve the issue, the control valve itself may need replacement, which typically requires professional service to maintain your system’s efficiency and longevity.
Dealing with Iron Buildup and Resin Fouling
Iron contamination reveals itself through rusty-orange stains in sinks and toilets, a metallic taste in your water, or reddish-brown discoloration in softened water. These signs indicate your resin beads have accumulated iron deposits, which block the softening process even when salt affects the ion exchange properly.
To address iron buildup, start with a resin cleaner specifically formulated for iron removal. Pour the recommended amount directly into your brine tank before regeneration. These cleaners contain citric acid or other safe compounds that dissolve iron without damaging the resin. For persistent fouling, consider scheduling quarterly cleaning treatments rather than waiting for problems to develop.
If your water contains more than 0.3 parts per million of iron, a pre-filter or oxidizing system before your softener prevents future buildup. This eco-friendly approach protects your investment and maintains optimal performance without harsh chemicals. Regular cleaning not only restores softening capacity but also extends your resin’s lifespan, reducing waste and the environmental impact of premature replacements. Monitor your water quality periodically to catch iron issues early, keeping your system running efficiently.
Motor and Mechanical Component Failures
Motor and mechanical component failures often signal when your water softener has moved beyond simple DIY territory. If you hear grinding noises, notice the motor running continuously without completing cycles, or find water pooling beneath the unit, these symptoms point to internal mechanical issues. Motors typically last 10-15 years with proper maintenance, but worn-out gears, damaged drive mechanisms, or failed seals eventually require attention.
You can safely troubleshoot some issues yourself: check for visible debris blocking moving parts, ensure the motor isn’t overheating due to poor ventilation, and verify electrical connections are secure. However, if the motor won’t start despite having power, if gears appear stripped or broken, or if seals are leaking despite cleaning, professional replacement becomes necessary. These components require specialized tools and technical knowledge to install correctly.
Environmental consideration matters here too—replacing individual failed components rather than the entire system reduces waste. A qualified technician can assess whether repair makes financial and ecological sense, helping you make sustainable choices while restoring your water softener’s performance and extending its useful life.
Preventive Maintenance to Avoid Future Problems
Regular Cleaning and Inspection Schedule
Preventing water softener problems starts with consistent upkeep. Monthly tasks should include checking salt levels in the brine tank—maintaining at least a quarter-full ensures proper regeneration—and inspecting for salt bridges, which are hardened crusts that prevent water from reaching the salt below. Simply press a broom handle gently into the salt; if it hits a hard layer with empty space beneath, break it up carefully.
Quarterly maintenance involves deeper cleaning. Empty and scrub the brine tank to remove sediment buildup that reduces efficiency and can harbor bacteria. This eco-friendly practice extends your system’s lifespan while maintaining peak performance. Every three to four months, sanitize the resin bed using a water softener cleaner or resin cleaner solution, following manufacturer instructions. This removes iron deposits, organic matter, and bacteria that accumulate over time, restoring the resin’s softening capacity. Regular maintenance not only prevents unexpected breakdowns but also optimizes water and salt usage, supporting both your household budget and environmental sustainability goals.
Choosing the Right Salt and Proper Storage
Selecting the right salt prevents many common water softener problems. Choose high-quality salt products specifically designed for water softeners—avoid rock salt, which contains impurities that can damage your system. Solar salt and evaporated salt pellets dissolve more cleanly and reduce maintenance issues.
Proper storage is equally important for preventing salt bridging and contamination. Keep salt in a dry, elevated location away from humidity. Store bags on pallets or shelves, never directly on concrete floors where moisture can seep through. Once opened, reseal bags tightly or transfer salt to airtight containers. Before adding new salt, check your brine tank for existing bridges or clumps. Maintaining your salt supply in optimal condition ensures consistent performance and extends your softener’s lifespan while reducing the need for troubleshooting interventions.
Water Testing and System Adjustments
Regular water testing helps you catch softener issues early and optimize system performance. Use water hardness test strips monthly to check if your softener is working effectively—soft water should measure 0-3 grains per gallon (gpg). If readings show higher hardness levels, your system may need adjustment.
Start by checking if your regeneration frequency matches your household’s water usage. Increase regeneration cycles if you’ve added family members or notice hard water symptoms returning. Most modern softeners allow you to adjust settings through a control panel—consult your manual for specific instructions.
Consider your environmental impact too: over-regeneration wastes salt and water, while under-regeneration leaves minerals in your water. Finding the right balance ensures efficient operation while conserving resources. If adjustments don’t resolve hardness issues, inspect salt levels, check for salt bridges, or examine the resin bed for potential problems requiring deeper troubleshooting.
When to Call a Professional vs. DIY Repairs
Knowing when to tackle repairs yourself versus calling a professional can save you money and prevent further damage to your water softener. Simple maintenance tasks like refilling salt, cleaning the brine tank, or adjusting regeneration settings are typically safe DIY projects. Most homeowners can also handle basic troubleshooting steps like checking power connections, testing water pressure, and cleaning sediment filters with the help of your owner’s manual.
However, certain situations warrant professional expertise. If you suspect internal valve failures, motor malfunctions, or control board issues, it’s best to call a licensed technician. Complicated problems like resin bed replacement, plumbing modifications, or electronic component repairs require specialized tools and knowledge. Additionally, if your softener is still under warranty, attempting DIY repairs might void coverage, making professional service the smarter choice.
Consider your comfort level with basic plumbing and mechanical systems honestly. If troubleshooting reveals a problem beyond simple fixes, or if you’ve already attempted repairs without success, professional help prevents costly mistakes. Some homeowners also choose this opportunity to explore more sustainable options like salt-free alternatives, which often require less maintenance long-term.
A good rule of thumb: handle routine maintenance yourself, but bring in professionals for anything involving electrical components, complex mechanical parts, or when safety concerns arise. This balanced approach keeps your system running efficiently while protecting your investment.
Most water softener issues don’t require expensive professional repairs or immediate equipment replacement. With the basic troubleshooting knowledge you’ve gained from this guide, you can diagnose and resolve common problems like salt bridges, resin bead depletion, and regeneration cycle errors yourself. Regular maintenance—checking salt levels monthly, cleaning the brine tank annually, and monitoring water hardness—keeps your system running efficiently for years.
A well-maintained water softener delivers benefits beyond just soft water. It protects your plumbing infrastructure from scale buildup, extends the lifespan of water-heating appliances, and significantly reduces your household’s detergent and soap consumption. This reduction means fewer chemicals entering waterways and less plastic packaging waste—small changes that align perfectly with sustainable living practices. You’re not just maintaining a household appliance; you’re making an eco-conscious choice that benefits both your home and the environment.
By staying proactive with upkeep and addressing issues promptly, you’ll enjoy consistently clean, soft water while supporting a more sustainable household. Your troubleshooting efforts today prevent bigger problems tomorrow, saving money and resources in the long run.